Receipt Layout
Layout
For printing a fiscal transaction, the data has to be formatted, which is done using the HTML templating engine PUG (former JADE). Language details can be found on pugjs.org.
For fiscal printers, the item description and additional text lines may be formatted freely, but referring amounts are created by the printer in a fixed format.
The following rules occur for fiscal receipts:
- one transaction specific barcode may be printed in the footer
- paper is cut after print completion
For details of layout commands see chapter PUG Editor.
You can start Layout editor on page kontrola in section PugEdit for layout configuration, it works as a WYSIWYG editor. Actual printout may differ due to limitations of the fiscal printer compared to HTML.
Besides fiscal.pug, different non-fiscal layout files can be provided on directory
/EFR/rn/def/cfg, the file name is derived from the DT or NF tag: NF="Login" => "login.pug"
(filename lowercase).
For non-fiscal printouts:
- the whole print line width (46 characters) can be used
- lines can be formatted emphazised (
<em>) or double height (<h3>)
Transaction Time
The fiscal printer itself has a clock - date and time printed on the receipt are printer time.
This can be queried via the /peri/print/state endpoint.
The transaction date ESR.D is not used.
Footer Printing
It is only allowed to print parameterized predefined texts in the footer, parameters are printed right-aligned. To use these, the lines have to start with one of the predefined texts.
List of prefefinded texts
Type 1 Parameter is a string that contains digits, special characters, blanks (ASCII code 0x20), and maximum 3 different letters or characters. The length of the string is from 1 to 24 characters.
Type 2 Parameter is a string that contains letters, special characters, blanks (ASCII code 0x20), and maximum 3 different digits. The length of the string is from 1 to 24 characters.
Type 4 Wide range of characters, footers do not contain LF characters. The length of the string is from 1 to 40 characters.
| Predefined text | Parameter type Exorigo |
|---|---|
| Reszta | 4 |
| linia bez słowa kluczowego | 1 |
| Bez narzutu | 1 |
| Numer | 1 |
| Przebieg km | 1 |
| Waluta | 1 |
| Stan licznika | 1 |
| Nr transakcji | 1 |
| Numer kierowcy | 1 |
| podpis | - |
| Przelicznik | 4 |
| Kasjer | 2 |
| Przedpłata do paragonu | 1 |
| Przedpłata do faktury | 1 |
| Uwzględniono rabat | 1 |
| Do zapłaty | 1 |
| Do wypłaty | 1 |
| pusta linia (spacje) | - |
| Wypłata zaliczki | 1 |
| Udzielony rabat | 1 |
| Punkty – bonus | 1 |
| Punkty – paragon | 1 |
| Razem punktów | 1 |
| Numer karty | 1 |
| Zyskałeś | 1 |
| Przyznano pkt | 1 |
| Stan konta | 1 |
| Dziękujemy za lojalność | - |
| Typ karty | 1 |
| Ważnado | 1 |
| Numer kasy | 1 |
| Numer zmiany | 1 |
| Nr pracownika | 1 |
| Nazw. pracownika | 2 |
| Konto przed tr. | 1 |
| Przyznano | 1 |
| Wykorzystano | 1 |
| Kontopotr. | 1 |
| Klient stały | 1 |
| Ilość sprzed. tow. | 1 |
| Kod | 4 |
| Nazwa | 4 |
| Opis | 4 |
| Liczba | 4 |
| Nazwisko | 4 |
| Nr zamówienia | 4 |
PUG Editor
Workflow:
- start http://localhost:5618/peri/pugedit with a browser
- [open] e.g. file
/EFR/rn/[your-client-id]/cfg/fiscal.pug - copy your sample transaction data into the textbox at the left side (JSON only)
- the right side box shows the transaction data transformed to HTML
- modifications in PUG code (center box) are shown immediately
- when finished [download] e.g. as fiscal.pug and copy it to:
/EFR/rn/[your-client-id]/cfg/
EFR now transforms every transaction into HTML and renders to the line printer. By their nature fiscal printers provide only very limited formatting functionality. At the moment the editor implementation is basic, but it is going to be evolved as base technique for transaction rendering and print layout.
Layout Example
/EFR/app/PL/cfg/fiscal.pug.template
//- fiscal.pug - Layout for Fiscal Transactions

-
  function fDec(dec) { return dec.replace(/\./,',') }
  function fQty(Qty) { if (Qty || Qty===0) return fDec(Qty.toString()) }
  function fAmt(Amt) { if (Amt || Amt===0) return fDec(Amt.replace?Amt:Amt.toFixed(2))
}
  function fPrc(Prc) { return fDec((Prc+'%').replace(/%%$/,'%')) }
  function fD(D) { return D.substr(8,2)+'-'+D.substr(5,2)+'-'+D.substr(2,2) }
  function fTime(D) { return D.substr(11,8).replace(/^0/,'') }

mixin row(arr)
  if arr
    hr
    each e in arr
      div(class=e._)
        if e.Qty
          .Lin
            .Dsc2= ' ' + fQty(e.Qty) + ' ' + (e.QtyU||'') + ' x ' + fAmt(e.Pri)
        if e.TaxG
          if e._!='Tax'
            .Dsc= e.Dsc
          else
            .DscTax
              .Prc= fPrc(e.Prc)
              .Net= fAmt(e.Net)
              .TAmt= fAmt(e.TAmt)
          .TaxG= e.TaxG
          else if e.Dsc
            .Dsc2= e.Dsc
          if !/^-*$/.test(e.LAmt)
            .Amt= fAmt(e.LAmt||e.Amt)
          else
            .Amt
              hr
mixin txt(arr)
  if arr
    br
    each e in arr
      .Txt= 'string'===typeof e ? e : 'Txt'===e._ ? e.value : unknown

html
  head
  title= ESR.DT||ESR.NF||'Receipt'
  style(type='text/css').
    body            { font-family:Courier; width:46ch }
    .Txt            { text-align:center; white-space:pre }
    .Pos,.Mod,.Lin,.Tot,.Pay,.Tax
                    { display:grid; grid-template-columns:35ch 1ch 8ch }
    .Dsc            { grid-column:1 }
    .TaxG           { }
    .Dsc2           { grid-column:1/span2 }
    .DscTax         { width:90%; display:grid; grid-template-columns:4fr 10fr 10fr }
    .Prc            { }
    .Net, .TAmt     { text-align:right }
    .Amt            { text-align:right; grid-column:3 }
    @media fiscal   {
    .Txt,.Tax,.Tot  { display:none }}
body
  if Sto
    .Txt= Sto.Name + ' ' + Sto.Add1
    .Txt= Sto.Zip + ' ' + Sto.City + ' TaxId: ' + Sto.VatR
  +txt(ESR.Head)
  +row(ESR.PosA)
  +row([{ _: 'Tot', Dsc: 'TOTAL', Amt: ESR.T }])
  +row(ESR.PayA)
  +row(ESR.TaxA)
  +txt(ESR.Foot)
  hr
  .Txt= 'Terminal: ' + ESR.TL + '/' + ESR.TT + ' ' + (ESR.NF||'Receipt') + ': ' +
ESR.TN
  .Txt= fD(ESR.D) + ' ' + fTime(ESR.D)
Restrictions
The fiscal printer allows only layout of item text, amounts are formatted by the printer. Although transaction data usually is provided with UTF-8 encoding, only CP852 characters can be printed.
Barcode
To add a barcode to a fiscal or non-fiscal layout enter:
div
img(data-barcode="type=ean13" data-value="123456789012" style="width:30ch;height:3ch")
The data-barcode attribute defines barcode parameters, data-value the content. Style (local or CSS) is used for dimensioning. On fiscal layouts, barcodes are only allowed in the footer of the receipt and only 1 barcode can be printed per position. By defining pos in the data-barcode attribute, barcodes can be positioned before (pos=1) or after the footer (pos=2):
div
img(data-barcode="type=qr;pos=1" data-value="123456789012")
When a transaction is booked that only contains deposit Pos items, no barcode or graphic will be printed in the footer of the receipt as these are special printouts that cannot be customized.
Example: Deposit-only transaction
{
	"Tra": {
		"ESR": {
			"TL": "001",
			"TT": "1",
			"Opr": "101",
			"OprN": "Mario Rossi",
			"OprTIN": "xxx",
			"TP": "Table 1",
			"PosA": [
				{
					"_": "Pos",
					"PN": "1",
					"PTY": "Dep",
					"IN": "1030",
					"Dsc": "Example Bottle deposit",
					"TaxG": "E",
					"Amt": "1.00",
					"Qty": "1"
				},
				{
					"_": "Pos",
					"PN": "2",
					"PTY": "Dep",
					"IN": "1030",
					"Dsc": "Example bottle deposit return",
					"TaxG": "E",
					"Amt": "-3.00"
				}
			],
			"PayA": [
				{
					"_": "Pay",
					"Dsc": "Example Payment",
					"PayG": "cash",
					"Amt": "-2.00"
				}
			]
		}
	}
}
Standard Barcodes
The following types apply to standard barcode implementations:
data-barcode
| Type | Character set (as regular expression) | |
|---|---|---|
| upc-a | A | [0-9]{11,12} |
| ean13 | C | [0-9]{12,13} |
| ean8 | D | [0-9]{7,8} |
| code39 | E | [0-9A-Z $%*+-./]{1,34} |
| itf | F | [0-9]{2,62} |
| codabar | G | [0-9A-Da-d$+-.&/:]{1,47} |
| code93 | H | [\u0000-\u007f^{ |
| code128-a | 73 | [\u0000-\u007f^{&omid}]{1,98} (default) |
| code128-b | 74 | [\u0000-\u007f^{&omid}]{1,98} |
| code128-c | 91 | [0-9]{1,98} |
| qr | R | .* |
data-value
For EAN types, a missing check digit is computed by EFR. The data-value can be set programmatically:
div
- var x = ESR.TL + ("0" + ESR.TT).slice(-2) + ("00000" + ESR.TN).slice(-6)
img(data-value=x style="width:30ch;height:3ch")
Posnet Barcodes
The supported barcode types differ for Posnet. Both fiscal and non-fiscal printouts are supported, with 1d or 2d barcodes.
Supported 1d Barcodes
| Type | Printout type | Character set (as regular expression) |
|---|---|---|
| ean13 | Non-fiscal only | [0-9]{12,13} |
| code128 | Fiscal and non-fiscal | [\u0000-\u007f^{&omid}]{1,98} |
Supported 2d Barcodes
| Type | Size limitations |
|---|---|
| qr | between 2 and 8px |
| aztec | at least 2px |
| dm | at least 2px |
| df417 | at least 2px |
Further Barcode Parameters
- The size of 2d barcodes can be customized
- The unit of measurement are pixels
- Setting the length can be done in the .pug templates
Example:
div
img(data-barcode="type=qr" data-value="123456789" style="width: 4px")
Using Logos with NF and Fiscal Receipts
The FP-T88FVA and FP-T88FVA Online printers can internally store up to 8 graphics, which can be displayed in the footer of printed receipts. The EFR provides API support for both uploading- and selecting these logos.
Uploading a Logo via the EFR API
Use the following endpoint to upload a logo:
POST
peri/print/load-graphic
| Query Parameters | Description |
|---|---|
RN | The register number |
index | A numeric value (1–8) used to identify the logo slot in the printer's memory |
Request Body
- Must contain the logo as a black-and-white image in .bmp format
- The bitmap must be provided as inverted bitmap data
- Image width and height constraints apply and can vary depending on the printer model
Headers
Content-Type: image/bmp
Successful Response
Image set with index: {index}
Selecting a Logo for the Printout Footer
After uploading a logo to the printer’s memory, it can be displayed in the footer by configuring the corresponding .pug template used for receipt styling.
For fiscal receipts, this is typically fiscal.pug, but for NF receipts, please use the corresponding NF template.
The selection mechanism is similar to configuring a barcode element. Here, data-img-index="1" specifies which stored logo (1–8) should be printed:
div
  img(data-barcode="type=qr;pos=1" data-value="123456789012" data-img-index="1")
Example Response
- XML
- JSON
<TraC SQ="3803">
  <Result RC="OK"/>
  <Fis D="10-09-18 14:36" FN="25" ZI="5" ID="CCO1800000739"/>
</TraC>
{
  "TraC":{"SQ":3800,
  "Result":{"RC":"OK"},
  "Fis":{"D":"10-09-18 14:34","FN":22,"ZI":5,"ID":"CCO1800000739"}}}
Response Fis fields:
| Element | Description |
|---|---|
| D | Fiscal printer Date and time |
| FN | Receipt Fiscal Number |
| ZI | Z report Index |
| ID | Fiscal printer ID |
Custom Elements in Pug Templates for Printing
Most of the data used in printouts and referenced in .pug templates is provided automatically by the printer or the transaction itself. In addition to these standard fields, custom elements can be included directly in the transaction request.
These custom elements are passed through unchanged and made available to the Pug rendering context.
This allows integrators to:
- Print additional, non-standard information
- Control layout behavior
- Pass parameters to custom logic (e.g. QR code payloads, flags, labels)
Custom Elements in Transactions
Custom elements can be added as additional attributes within the ESR object. The custom attribute included in the request will be accessible in the Pug template under the ESR object
The element is neither validated nor interpreted by the system itself — it is simply forwarded to the print template.
Example
- XML
- JSON
<Tra>
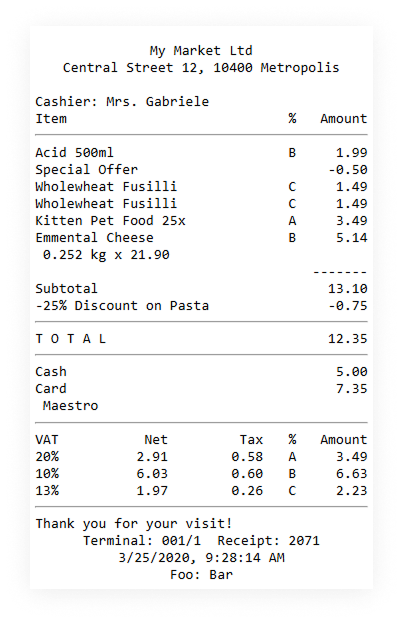
<ESR D="2020-03-25T09:28:14" TL="001" TT="1" TN="2071" T="12.35" Custom_Element="Bar">
<Head>
<Txt>Cashier: Mrs. Gabriele</Txt>
</Head>
<PosA>
<Pos PN="1" IN="4012345678901" Dsc="Acid 500ml" TaxG="B" Amt="1.99"/>
<Mod PN="1" Dsc="Special Offer" Amt="-0.50"/>
<Pos PN="2" IN="9023456789001" Dsc="Wholewheat Fusilli" TaxG="C" Amt="1.49"/>
<Pos PN="3" IN="9023456789001" Dsc="Wholewheat Fusilli" TaxG="C" Amt="1.49"/>
<Pos PN="4" IN="4198765432109" Dsc="Kitten Pet Food 25x" TaxG="A" Amt="3.49"/>
<Pos PN="5" Dsc="Emmental Cheese" TaxG="B" Amt="5.14" Qty="0.252" QtyU="kg" Pri="21.90"/>
<Lin LAmt="-------"/>
<Lin Dsc="Subtotal" LAmt="13.10"/>
<Mod PN="2 3" Dsc="-25% Discount on Pasta" Amt="-0.75"/>
</PosA>
<PayA>
<Pay Dsc="Cash" Amt="5.00"/>
<Pay Dsc="Card" Amt="7.35" UID="17075378 004704 004518"/>
<Lin Dsc="Maestro"/>
</PayA>
<TaxA>
<Tax TaxG="A" Prc="20" Net="2.91" TAmt="0.58" Amt="3.49" />
<Tax TaxG="B" Prc="10" Net="6.03" TAmt="0.60" Amt="6.63" />
<Tax TaxG="C" Prc="13" Net="1.97" TAmt="0.26" Amt="2.23" />
</TaxA>
<Foot>
<Txt>Thank you for your visit!</Txt>
</Foot>
</ESR>
</Tra>
{
  "Tra": {
    "ESR": {
      "D": "2020-03-25T09:28:14",
      "TL": "001",
      "TT": "1",
      "TN": "2071",
      "T": "12.35",
      "Custom_Element": "Bar",
      "Head": [
        {
          "_": "Txt",
          "value": "Cashier: Mrs. Gabriele"
        }
      ],
      "PosA": [
        {
          "_": "Pos",
          "PN": "1",
          "IN": "4012345678901",
          "Dsc": "Acid 500ml",
          "TaxG": "B",
          "Amt": "1.99"
        },
        {
          "_": "Mod",
          "PN": "1",
          "Dsc": "Special Offer",
          "Amt": "-0.50"
        },
        {
          "_": "Pos",
          "PN": "2",
          "IN": "9023456789001",
          "Dsc": "Wholewheat Fusilli",
          "TaxG": "C",
          "Amt": "1.49"
        },
        {
          "_": "Pos",
          "PN": "3",
          "IN": "9023456789001",
          "Dsc": "Wholewheat Fusilli",
          "TaxG": "C",
          "Amt": "1.49"
        },
        {
          "_": "Pos",
          "PN": "4",
          "IN": "4198765432109",
          "Dsc": "Kitten Pet Food 25x",
          "TaxG": "A",
          "Amt": "3.49"
        },
        {
          "_": "Pos",
          "PN": "5",
          "Dsc": "Emmental Cheese",
          "TaxG": "B",
          "Amt": "5.14",
          "Qty": "0.252",
          "QtyU": "kg",
          "Pri": "21.90"
        },
        {
          "_": "Lin",
          "LAmt": "-------"
        },
        {
          "_": "Lin",
          "Dsc": "Subtotal",
          "LAmt": "13.10"
        },
        {
          "_": "Mod",
          "PN": "2 3",
          "Dsc": "-25% Discount on Pasta",
          "Amt": "-0.75"
        }
      ],
      "PayA": [
        {
          "_": "Pay",
          "Dsc": "Cash",
          "Amt": "5.00"
        },
        {
          "_": "Pay",
          "Dsc": "Card",
          "Amt": "7.35",
          "UID": "17075378 004704 004518"
        },
        {
          "_": "Lin",
          "Dsc": "Maestro"
        }
      ],
      "TaxA": [
        {
          "_": "Tax",
          "TaxG": "A",
          "Prc": "20",
          "Net": "2.91",
          "TAmt": "0.58",
          "Amt": "3.49"
        },
        {
          "_": "Tax",
          "TaxG": "B",
          "Prc": "10",
          "Net": "6.03",
          "TAmt": "0.60",
          "Amt": "6.63"
        },
        {
          "_": "Tax",
          "TaxG": "C",
          "Prc": "13",
          "Net": "1.97",
          "TAmt": "0.26",
          "Amt": "2.23"
        }
      ],
      "Foot": [
        {
          "_": "Txt",
          "value": "Thank you for your visit!"
        }
      ]
    }
  }
}
Custom Elements in Pug Templates
Custom elements added to the transaction can be referenced directly in the .pug template via the ESR object.
They can be used:
- As printable text
- As input to template logic
- As parameters for embedded elements (e.g. QR codes, barcodes, conditional sections)
Example usage in a Pug template:
.TxtCenter= `Foo: ${ESR.Custom_Element}`
- The value of Custom_Element is supplied in the transaction request
- It is rendered directly in the receipt output
Resulting Printout
The custom element defined in the request is rendered in the final printout.
This is the output corresponding to the example provided above: