EFR Czechia
Czechia is reintroducing the electronic registration of sales as EET 2.0, using data interface version 4. Production starts in pilot mode on 1 January 2027 and becomes fully binding on 1 February 2027.
EFR currently supports EET 2.0 against the tax authority's test environment (playground) only. See the EET 2.0 Roadmap for the dates and what you need to prepare when.
Quick Start
Step 1 – EFR API Integration
This onboarding guide was written to assist efsta customer’s with the efsta Portal and EFR setup after the POS has been integrated to the EFR API. For EFR API Documentation, please refer to API
Step 2 – efsta Portal
Set up the efsta Portal.
Creating Organizations, Companies & Locations
First you will receive an invitation to our efsta Portal. If you still require an invite, please get in touch with our team at ticket@efsta.eu.
For each of the following sections, you have the option between an active or inactive setup (for testing). Please make sure to follow the steps appropriate to your demands.
For testing/sandbox purposes, please create a test-organization with test-companies and test-EFRs. If you test with an active/live EFR, an invoice will automatically be issued (unless deactivated within the same day).
- Testing Setup
- Active Setup
Testing Organizations
organizations are used for structuring in the efsta portal. We recommend creating a separate organization for each country (e.g. Customer AT, Customer FR)
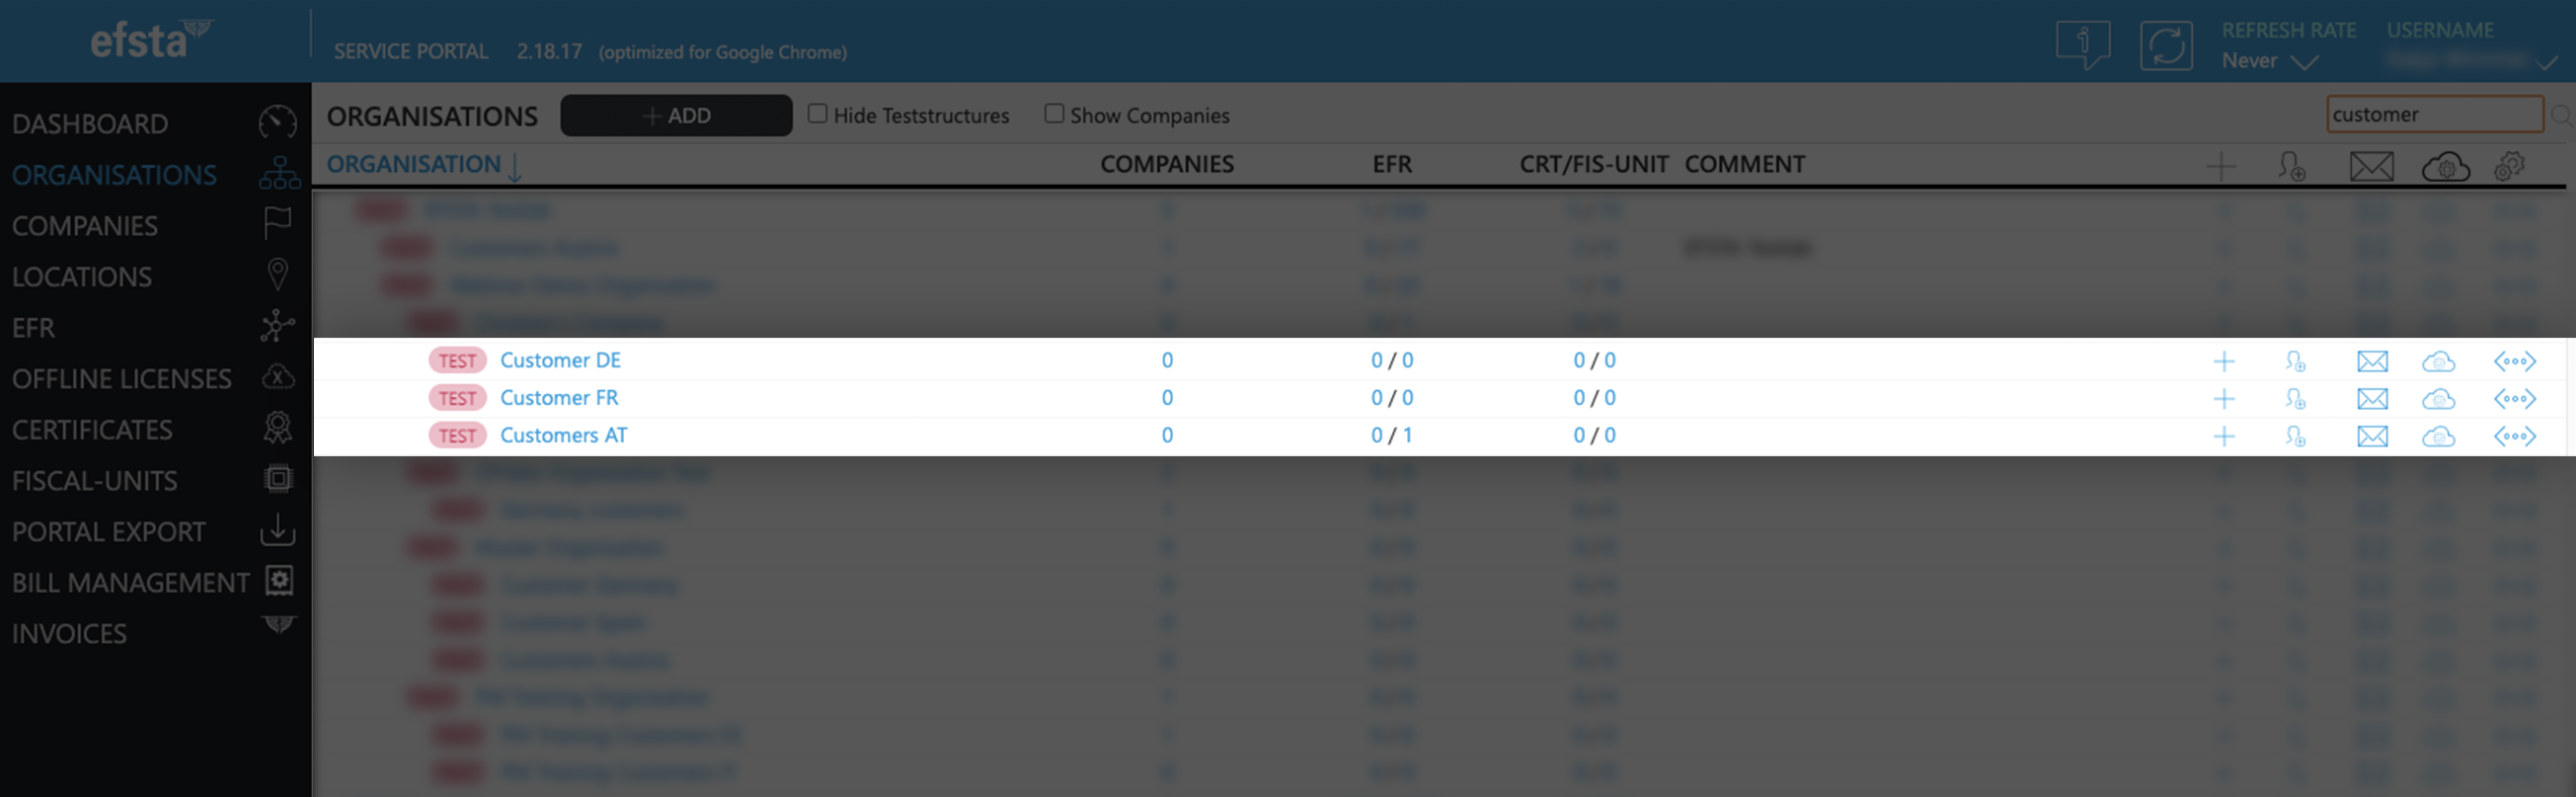
- On the main page of the efsta portal, click on “organizations” in the left side menu

- Click on „Add“

- In the pop up window, select your organization from the drop-down menu
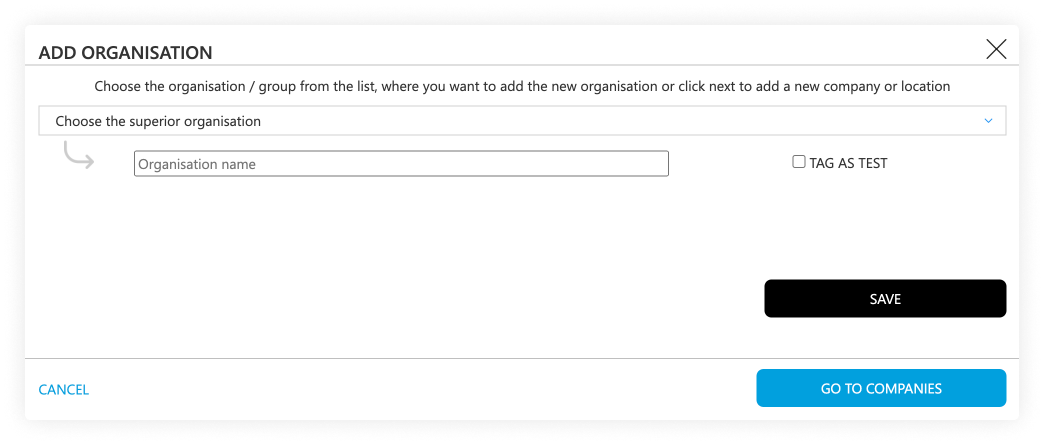
- Enter the name of the test-organization you want to create
(f.e. “efsta IT Services Gmbh Test Organization”) - Tick the "tag as test" checkbox
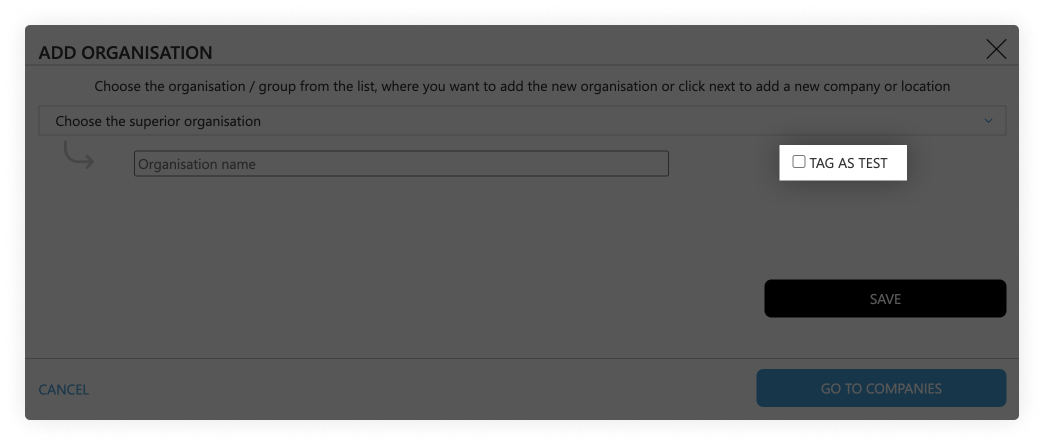
- Click on the save button
Testing Companies
- Go to the page „Companies“

- Click on the „Add“ button

- In the pop-up window, select the test-organization that was just created
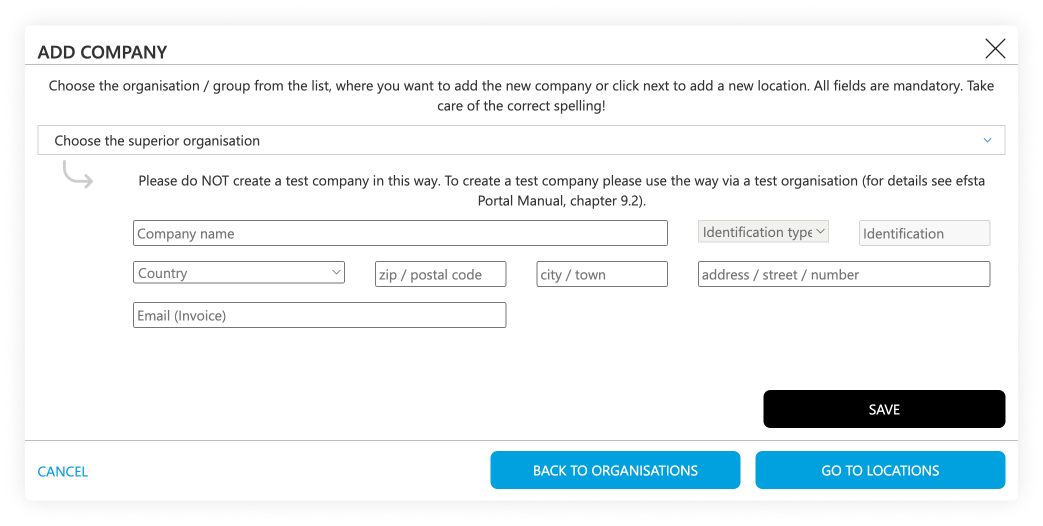
- Select the correct country
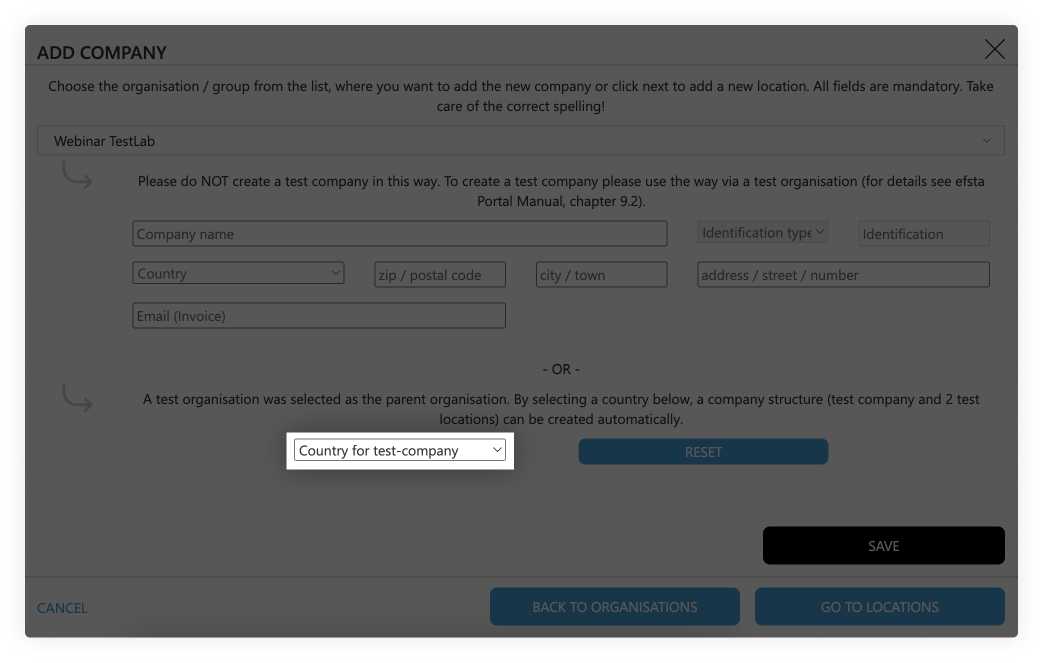
- Click on the save button
Testing Locations
Test-companies are automatically created with two location sites for testing purposes.
Active Organizations
Organizations are used for structuring in the efsta portal. We recommend creating a separate organization for each country (e.g. Customer AT, Customer FR)
- On the main page of the efsta portal, click on “organizations” in the left side menu
- Click on „Add“
- In the pop up window, select your organization from the drop-down menu
- Enter the name of the organization you want to create
(f.e. “efsta IT Services Gmbh Organization”) - Click on the save button
Active Companies
- Go to the page „Companies“
- Click on the „ADD“ button
- In the pop-up window, select the organization that was just created
- Select the correct country
- Enter the company data. At identification type, choose „EUROPE VAT-id“, country specific tax number, or GLN number if applicable
- Click on the save button
 DE | Germany
For German companies you can add the WIdNr (Wirtschafts-Identifikationsnummer) – this is currently optional but will be mandatory from 01.01.2027 onwards as requirement for the german reporting obligation.
Active Locations
- Go to „Locations“ in the left side menu

- Click on „Add“
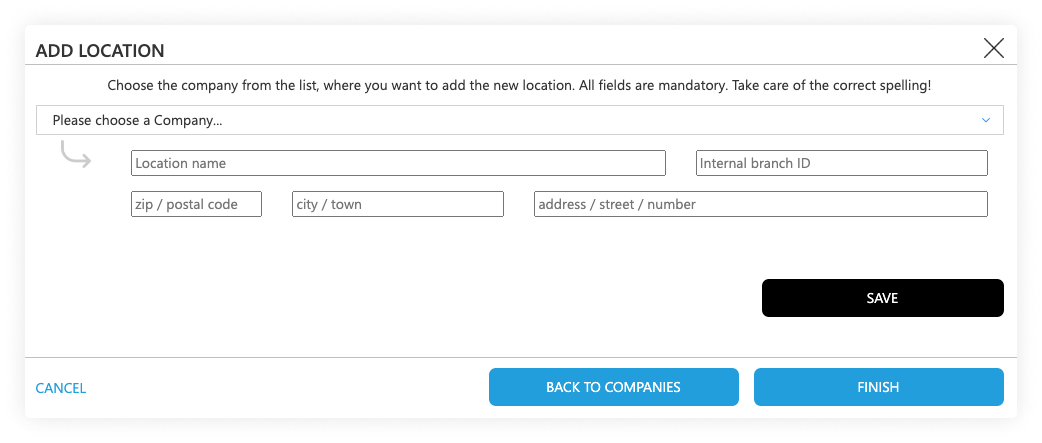
- In the pop-up window, select the company you just created
- Enter the location information
- The internal branch ID should match with the TL which you send in the transactions
Inviting Users & Permissions
After you have finished your organization structure, you can invite users to manage the correlating organization, depending on where they should have access.
User Invitations & Permission Setting
- Go back to “Organizations” page and the find your top organization
- On the right side (next to the organization, company, or location) click on the "add user" symbol:

- In the pop-up window, enter the mail address of the person you want to invite to the Portal and select the permissions you want to assign to them:
- Editor: can edit data, create companies and deactivate EFR
- Viewer: Read-only access with optional data sharing permissions
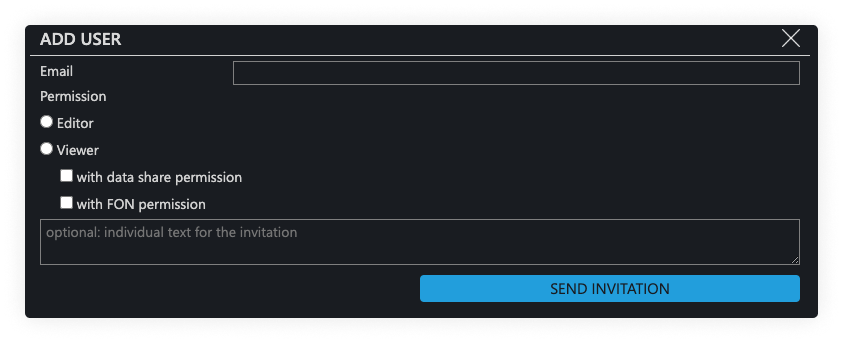
- Click on the button „send invitation“ so the invited person will receive an email with a registration token
The invitation is valid for 10 days.
-
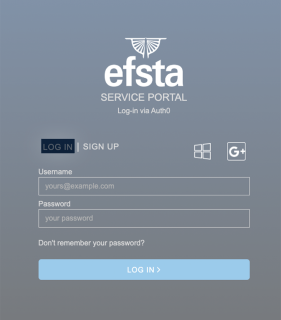
- The user to whom the invitation was sent has to sign up with their mail address and a custom password
- Alternatively, they can also sign up with a Google or Microsoft account
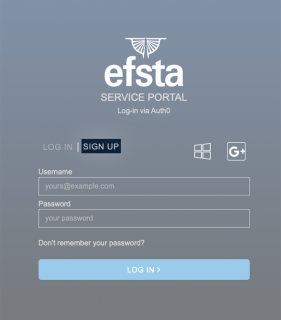
- After the registration was completed, they can log in
Step 3 - Local Installation // Web-API
At this point, there are two different paths you can take with your setup: Local Installation or Cloud Installation. Please continue with only one of the following two steps:
If your POS runs locally (Windows, Linux, Android), continue with Step 3 below.
If your POS is fully cloud-based and requires no local installation, use Cloud EFR instead of Step 3.
See the Cloud EFR guide →System Requirements
System Requirements
- Operating System
- Windows 7 or higher
- Linux
- Android 8 or higher
- Typically 1 GB hard disk space reserved
- Minimum 100 MB per POS
- Administration rights during installation
- Internet access for cloud services
- EFR should run locally for fail-safety reasons.
- Cloud EFR can only be used for fully cloud-based POS systems. See Cloud EFR
- We recommend whitelisting the email address noreply@efsta.net when using a spam filter to ensure notifications from our efsta portal are delivered.
Firewall Settings
| Partner | Host | Used for |
|---|---|---|
| efsta cloud | https://*.efsta.net:443 https://fr.efsta.net:443 https://de-fr.efsta.net:443 | EFR in Online mode for archiving data |
Remote Signature
| Partner | Used for | Host | |
|---|---|---|---|
[AT]  | A-Trust | External HSM signature | https://hs-abnahme.a-trust.at:443 https://rksv.a-trust.at/ |
 | Prime-Sign | External HSM signature | https://rs-1f9e614c.ps.prime-sign.com:443 https://rs-2759ffb9.ps.prime-sign.com (please see note below) |
[BE]  | zwartedoos.be | Remote Test FDM | https://sdk.zwartedoos.be:443 |
[DE] | Deutsche Fiskal | Remote TSE | https://fiskal.cloud:443 |
| Fiskaly | Remote TSE | https://kassensichv.io:443 https://*.fiskaly.com:443 |
| Swissbit Cloud | Remote TSE Test | https://web-tse.de:443 https://dev.web-tse.de:443 |
[SE]  | Infrasec | Productive Test | https://ccu.infrasec.se:8449 https://ccu-verify.infrasec.se:8449 |
Please note that Prime-Sign has not just one HSM Server, but a cluster. If certificates are ordered using the efsta Cloud Portal, you'll see the host address in the portal. However, should the certificate be ordered through different channels, it is possible that it resides on a different server, using a different IP.
Fiscal Authority
| Partner | Used for | Host | |
|---|---|---|---|
[CZ]  | EET 2.0 | Productive Test | https://*.trzbyeet.gov.cz:443 https://pg.trzbyeet.gov.cz:443 |
[ES]  | VERI*FACTU | Productive Test | https://www1.agenciatributaria.gob.es https://prewww1.aeat.es |
| Araba | Productive Test | https://ticketbai.araba.eus https://pruebas-ticketbai.araba.eus | |
| Bizkaia | Productive Test | https://sarrerak.bizkaia.eus https://pruesarrerak.bizkaia.eus | |
| Gipuzkoa | Productive Test | https://tbai-z.egoitza.gipuzkoa.eus https://tbai-z.prep.gipuzkoa.eus | |
[HR]  | FINA | Productive Test | https://cis.porezna-uprava.hr:8449 https://cistest.apis-it.hr:8449 |
[PT]  | Productive | https://servicos.portaldasfinancas.gov.pt:422/SeriesWSService | |
[SI]  | FURS | Productive Test | https://blagajne.fu.gov.si:9003 https://blagajne-test.fu.gov.si:9002 |
Fiscal Devices
| Partner | Used for | Host | |
|---|---|---|---|
[BE] | zwartedoos.be | Productive NTP | *:443 *:123 |
Fiscal Printer
| Partner | Used for | Host | |
|---|---|---|---|
[HU]  | BBOX | Productive | 193.91.88.26:4791 |
[SK]  | BBOX | Productive | 193.91.88.26:4791 |
[IT]  | Epson | Productive | - |
| Custom | Productive | - |
[PL]  | Productive Productive Test Test | https://esb.mf.gov.pl:5062 https://e-kasy.mf.gov.pl https://esb-te.mf.gov.pl:5062 https://test-e-kasy.mf.gov.pl | |
| Exorigo | Productive Productive Test Firmware Update NTP NTP | crr-eh01-prd.servicebus.windows.net:443 crr-eh02-prd.servicebus.windows.net:443 crr-eh-we-tst.servicebus.windows.net:443 upfirm.exorigo-upos.pl:4433 tempus1.gum.gov.pl:123 tempus2.gum.gov.pl:123 |
- Local Installation
- Windows
- Linux
- Android
- Go to public.efsta.net and select the appropriate country
- Download the correct installers for your system
- Install the software
- Once finished, open a browser and enter “localhost:5618” in the address line
- The EFR user-interface will open
Windows
- Windows 7 or higher
- .msi from public.efsta.net
- Runs as Windows service
Linux
- .zip from public.efsta.net
- Run file install.sh
- Run automation recommended, e.g. with systemd
- Setup run automation with install.sh:
install.sh --service --service-user=USER
Required packages for USB/Serial devices:
libudev-dev
Required packages for smartcard use:
libpcsclite1 libpcsclite-dev pcscd build-essential libudev-dev
ATTENTION: Swissbit / GermanyIn order for the TSEs to properly work on arm64, the libffi library is needed on the system.
Most Linux distributions should come with this pre installed but it’s presence on the system can be checked with the following command:
dpkg -l | grep libffi
Which should produce an output similar to this:
ii libffi8:arm64 3.4.4-1 arm64 Foreign Function Interface library runtime


Android
- Android 8 or higher
- .apk from public.efsta.net
- Execute and install apk on the device
- Disable battery optimization on first start (even if device is always plugged in / has no battery)
- On the first start the app will ask whether to disable battery optimization. Disabling it is required to ensure the app can run in the background and will not be suspended by the OS. Please make sure to test if the app can run interruption-free on your specific device and android version.
Please make sure to keep the app's data or perform a backup/export of all data you want to keep BEFORE uninstalling. Default data deletion behavior can vary between different android device manufacturers.
Connecting the EFR see also API Profile
In order to connect the EFR with the efsta Portal (recorder: online), follow these steps:
- In the portal, navigate to “Companies” on the left side menu
- Open the properties of your company

- Locate and copy the badge number
If you are using a MultiCompany installation, the badge of an organization must be selected.
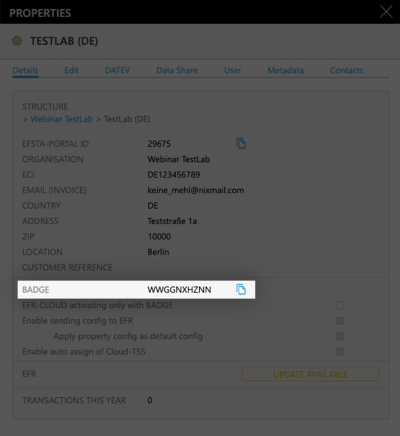
- In the EFR, go to "Profile" and paste the badge
(Optional) For MultiPOS & MultiCompany, tick the checkbox “RN/TT” at "Client Assignment" on
Please double check that the Badge is correct before saving since it cannot be changed after activation
MultiPOS is ONE installed EFR, managing multiple cash registers from the same company (usually a back-office server)
MultiCompany is ONE installed EFR, managing multiple companies, locations, and cash registers (only possible when cloud-hosting our EFR)
If you are interested in any of these two modes, please contact your partner manager for a consulting appointment!
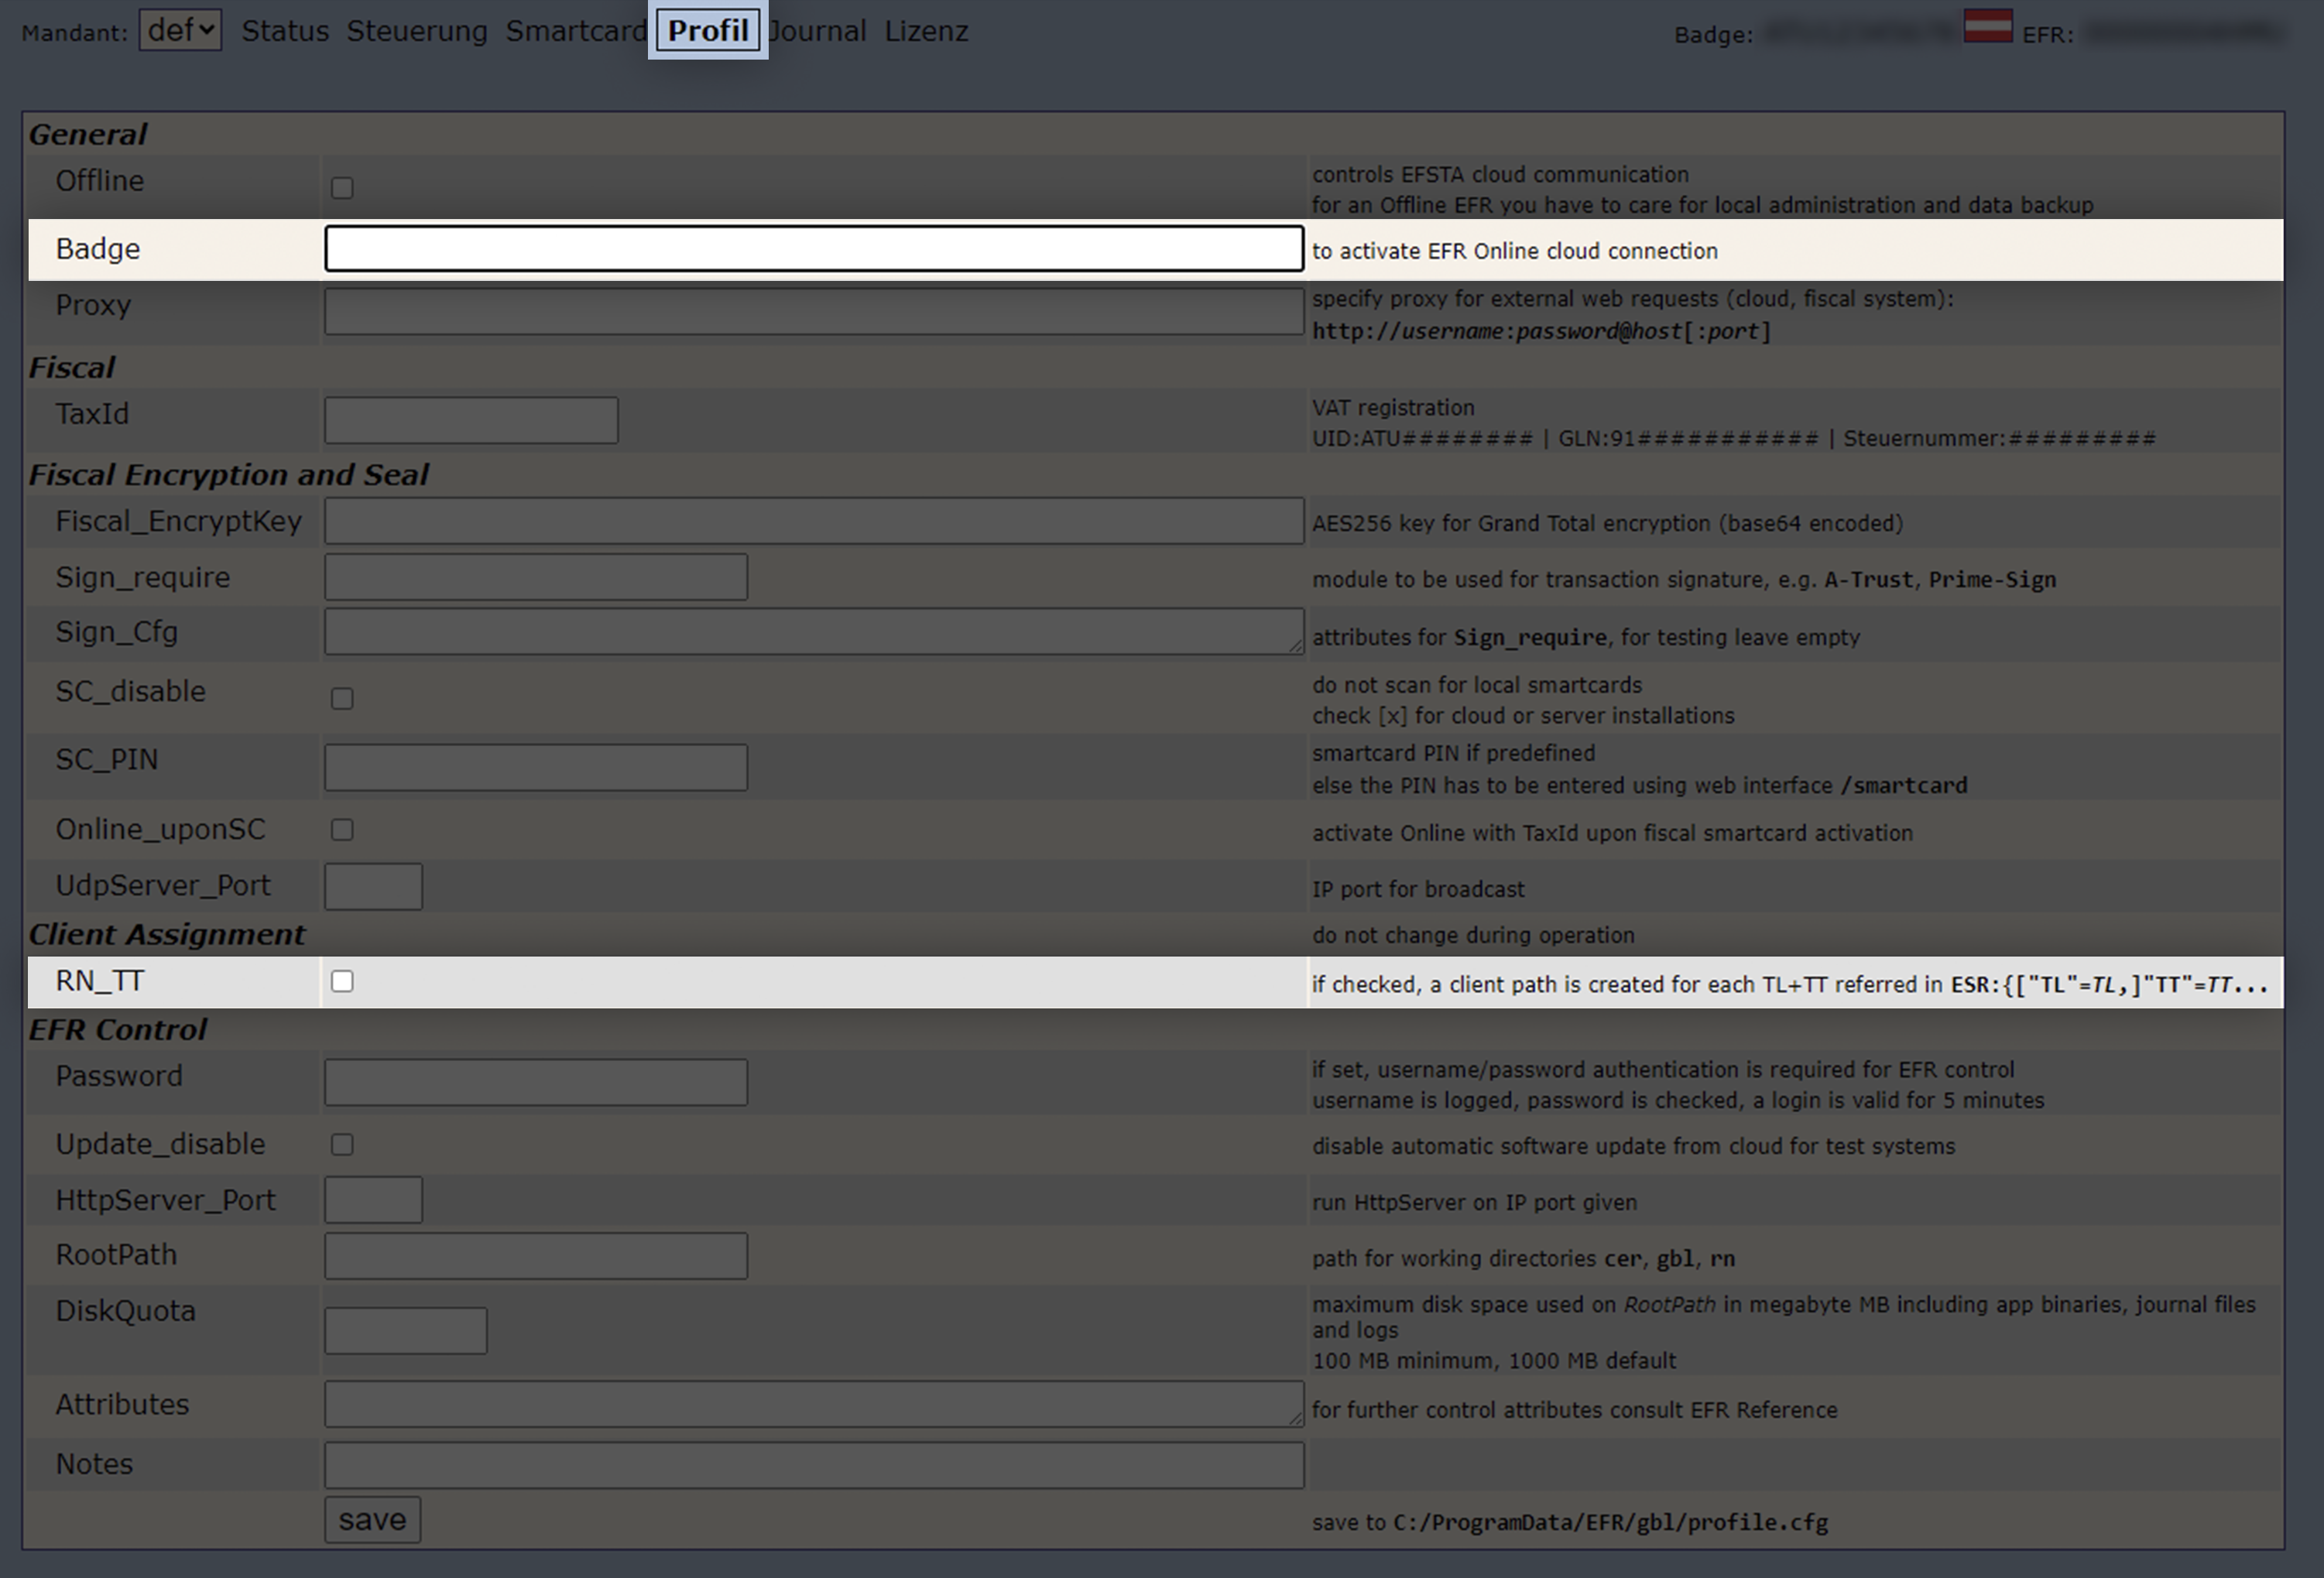
- Save the profile, so the communication to the efsta Portal is activated.
The EFR status will change to “Online”.
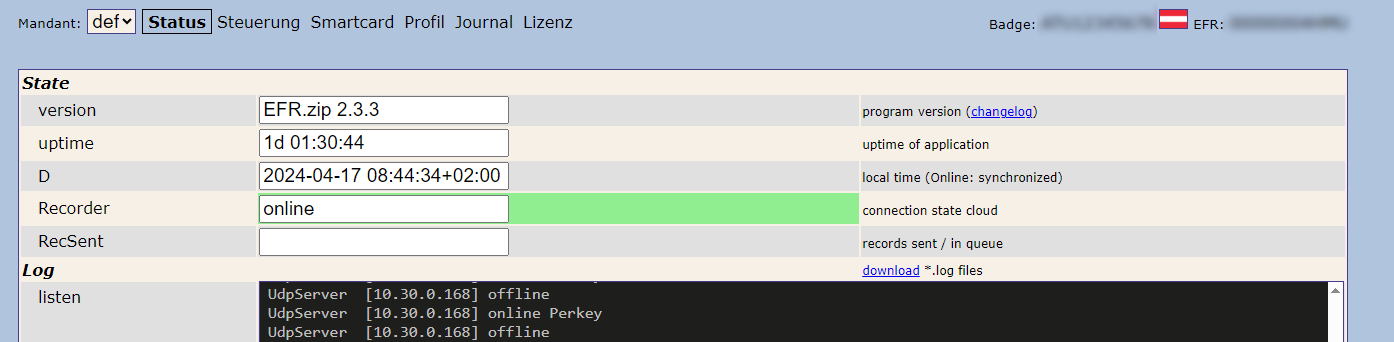
Please allow communication to the efsta Portal through your firewall. If not, it will cause connection issues.
For automated / scripted deployments, EFR Profile settings can also be configured via environment variables. See: ENV-based EFR Profile Configuration (Advanced)
Step 4 - Register your unit and obtain a certificate
Both are done by the taxpayer in the Czech tax portal MOJE daně (DIS+), and both are prerequisites for sending a single sale:
- Register the registrating unit. The portal assigns a unit ID (
id_jednotky) per unit — a branch, a store, a mobile sales point. This value is issued by the portal; it is not the same thing as yourESR.TLand you cannot choose it yourself. - Order the point-of-sale certificate. An RSA-2048 certificate issued by the EET CA 2 authority (EET CA 2 Playground for testing), valid for 366 days.
Unit registration and production certificates are available from 1 November 2026. Until then, only the shared playground test certificates can be used, and only against the playground.
Upload the certificate file (.p12) on the control page http://localhost:5618/control:


The certificate was installed correctly if the green OK bar is shown. Certificate file and password are confidential. Because certificates expire after 366 days, renewal is an annual task — EFR warns when a certificate expires in less than 31 days.
Step 5 - Configure the profile
In the profile at http://localhost:5618/profile, set:
| Setting | Meaning |
|---|---|
Loc.LegalId | The unit ID (id_jednotky) from the DIS+ portal |
Cmp.TaxId | Your EIC, format CZ + 8 to 10 digits, e.g. CZ00000019 — must match the certificate |
Fiscal_test | Set this attribute to send to the playground instead of production |
The register number (id_pokl) is taken from ESR.TT, so no separate configuration is needed.
Step 6 - Verify the connection
Use the Echo feature on http://localhost:5618/control. It sends a message in verification mode, so nothing is ever registered as a sale.

In verification mode the tax authority answers with error code 0 and the text "Datovou zpravu evidovane trzby v overovacim modu se podarilo zpracovat". That code 0 is the success answer — no acknowledgement code (POK) is issued in this mode.
Step 7 - efsta Implementation Checklist
Before going live, you must submit the implementation checklist for validation. To acquire access, please contact your partner manager.
Please be aware that our consulting team requires 2–4 weeks to complete the review.
Legacy: EET 1.0 (valid until 2023)
The registration of sales under Act No. 112/2016 was discontinued at the end of 2022 and the interface it used (version 3) has been switched off. The guide below is kept for reference only and must not be used for new integrations.
Legacy quick start guide (valid until 2023)
Step 1 – EFR API Integration
This onboarding guide was written to assist efsta customer’s with the efsta Portal and EFR setup after the POS has been integrated to the EFR API. For EFR API Documentation, please refer to API
Step 2 – efsta Portal
Set up the efsta Portal.
Creating Organizations, Companies & Locations
First you will receive an invitation to our efsta Portal. If you still require an invite, please get in touch with our team at ticket@efsta.eu.
For each of the following sections, you have the option between an active or inactive setup (for testing). Please make sure to follow the steps appropriate to your demands.
For testing/sandbox purposes, please create a test-organization with test-companies and test-EFRs. If you test with an active/live EFR, an invoice will automatically be issued (unless deactivated within the same day).
- Testing Setup
- Active Setup
Testing Organizations
organizations are used for structuring in the efsta portal. We recommend creating a separate organization for each country (e.g. Customer AT, Customer FR)
- On the main page of the efsta portal, click on “organizations” in the left side menu
- Click on „Add“
- In the pop up window, select your organization from the drop-down menu
- Enter the name of the test-organization you want to create
(f.e. “efsta IT Services Gmbh Test Organization”) - Tick the "tag as test" checkbox
- Click on the save button
Testing Companies
- Go to the page „Companies“
- Click on the „Add“ button
- In the pop-up window, select the test-organization that was just created
- Select the correct country
- Click on the save button
Testing Locations
Test-companies are automatically created with two location sites for testing purposes.
Active Organizations
Organizations are used for structuring in the efsta portal. We recommend creating a separate organization for each country (e.g. Customer AT, Customer FR)
- On the main page of the efsta portal, click on “organizations” in the left side menu
- Click on „Add“
- In the pop up window, select your organization from the drop-down menu
- Enter the name of the organization you want to create
(f.e. “efsta IT Services Gmbh Organization”) - Click on the save button
Active Companies
- Go to the page „Companies“
- Click on the „ADD“ button
- In the pop-up window, select the organization that was just created
- Select the correct country
- Enter the company data. At identification type, choose „EUROPE VAT-id“, country specific tax number, or GLN number if applicable
- Click on the save button
DE | GermanyFor German companies you can add the WIdNr (Wirtschafts-Identifikationsnummer) – this is currently optional but will be mandatory from 01.01.2027 onwards as requirement for the german reporting obligation.
Active Locations
- Go to „Locations“ in the left side menu
- Click on „Add“
- In the pop-up window, select the company you just created
- Enter the location information
- The internal branch ID should match with the TL which you send in the transactions
Inviting Users & Permissions
After you have finished your organization structure, you can invite users to manage the correlating organization, depending on where they should have access.
User Invitations & Permission Setting
- Go back to “Organizations” page and the find your top organization
- On the right side (next to the organization, company, or location) click on the "add user" symbol:
- In the pop-up window, enter the mail address of the person you want to invite to the Portal and select the permissions you want to assign to them:
- Editor: can edit data, create companies and deactivate EFR
- Viewer: Read-only access with optional data sharing permissions
- Click on the button „send invitation“ so the invited person will receive an email with a registration token
The invitation is valid for 10 days.
-
- The user to whom the invitation was sent has to sign up with their mail address and a custom password
- Alternatively, they can also sign up with a Google or Microsoft account
- After the registration was completed, they can log in
Step 3 - Local Installation // Web-API
At this point, there are two different paths you can take with your setup: Local Installation or Cloud Installation. Please continue with only one of the following two steps:
If your POS runs locally (Windows, Linux, Android), continue with Step 3 below.
If your POS is fully cloud-based and requires no local installation, use Cloud EFR instead of Step 3.
See the Cloud EFR guide →System Requirements
System Requirements
- Operating System
- Windows 7 or higher
- Linux
- Android 8 or higher
- Typically 1 GB hard disk space reserved
- Minimum 100 MB per POS
- Administration rights during installation
- Internet access for cloud services
- EFR should run locally for fail-safety reasons.
- Cloud EFR can only be used for fully cloud-based POS systems. See Cloud EFR
- We recommend whitelisting the email address noreply@efsta.net when using a spam filter to ensure notifications from our efsta portal are delivered.
Firewall Settings
| Partner | Host | Used for |
|---|---|---|
| efsta cloud | https://*.efsta.net:443 https://fr.efsta.net:443 https://de-fr.efsta.net:443 | EFR in Online mode for archiving data |
Remote Signature
| Partner | Used for | Host | |
|---|---|---|---|
[AT] | A-Trust | External HSM signature | https://hs-abnahme.a-trust.at:443 https://rksv.a-trust.at/ |
| Prime-Sign | External HSM signature | https://rs-1f9e614c.ps.prime-sign.com:443 https://rs-2759ffb9.ps.prime-sign.com (please see note below) |
[BE] | zwartedoos.be | Remote Test FDM | https://sdk.zwartedoos.be:443 |
[DE] | Deutsche Fiskal | Remote TSE | https://fiskal.cloud:443 |
| Fiskaly | Remote TSE | https://kassensichv.io:443 https://*.fiskaly.com:443 |
| Swissbit Cloud | Remote TSE Test | https://web-tse.de:443 https://dev.web-tse.de:443 |
[SE] | Infrasec | Productive Test | https://ccu.infrasec.se:8449 https://ccu-verify.infrasec.se:8449 |
Please note that Prime-Sign has not just one HSM Server, but a cluster. If certificates are ordered using the efsta Cloud Portal, you'll see the host address in the portal. However, should the certificate be ordered through different channels, it is possible that it resides on a different server, using a different IP.
Fiscal Authority
| Partner | Used for | Host | |
|---|---|---|---|
[CZ] | EET 2.0 | Productive Test | https://*.trzbyeet.gov.cz:443 https://pg.trzbyeet.gov.cz:443 |
[ES] | VERI*FACTU | Productive Test | https://www1.agenciatributaria.gob.es https://prewww1.aeat.es |
| Araba | Productive Test | https://ticketbai.araba.eus https://pruebas-ticketbai.araba.eus | |
| Bizkaia | Productive Test | https://sarrerak.bizkaia.eus https://pruesarrerak.bizkaia.eus | |
| Gipuzkoa | Productive Test | https://tbai-z.egoitza.gipuzkoa.eus https://tbai-z.prep.gipuzkoa.eus | |
[HR] | FINA | Productive Test | https://cis.porezna-uprava.hr:8449 https://cistest.apis-it.hr:8449 |
[PT] | Productive | https://servicos.portaldasfinancas.gov.pt:422/SeriesWSService | |
[SI] | FURS | Productive Test | https://blagajne.fu.gov.si:9003 https://blagajne-test.fu.gov.si:9002 |
Fiscal Devices
| Partner | Used for | Host | |
|---|---|---|---|
[BE] | zwartedoos.be | Productive NTP | *:443 *:123 |
Fiscal Printer
| Partner | Used for | Host | |
|---|---|---|---|
[HU] | BBOX | Productive | 193.91.88.26:4791 |
[SK] | BBOX | Productive | 193.91.88.26:4791 |
[IT] | Epson | Productive | - |
| Custom | Productive | - |
[PL] | Productive Productive Test Test | https://esb.mf.gov.pl:5062 https://e-kasy.mf.gov.pl https://esb-te.mf.gov.pl:5062 https://test-e-kasy.mf.gov.pl | |
| Exorigo | Productive Productive Test Firmware Update NTP NTP | crr-eh01-prd.servicebus.windows.net:443 crr-eh02-prd.servicebus.windows.net:443 crr-eh-we-tst.servicebus.windows.net:443 upfirm.exorigo-upos.pl:4433 tempus1.gum.gov.pl:123 tempus2.gum.gov.pl:123 |
- Local Installation
- Windows
- Linux
- Android
- Go to public.efsta.net and select the appropriate country
- Download the correct installers for your system
- Install the software
- Once finished, open a browser and enter “localhost:5618” in the address line
- The EFR user-interface will open
Windows
- Windows 7 or higher
- .msi from public.efsta.net
- Runs as Windows service
Linux
- .zip from public.efsta.net
- Run file install.sh
- Run automation recommended, e.g. with systemd
- Setup run automation with install.sh:
install.sh --service --service-user=USER
Required packages for USB/Serial devices:
libudev-dev
Required packages for smartcard use:
libpcsclite1 libpcsclite-dev pcscd build-essential libudev-dev
ATTENTION: Swissbit / GermanyIn order for the TSEs to properly work on arm64, the libffi library is needed on the system.
Most Linux distributions should come with this pre installed but it’s presence on the system can be checked with the following command:
dpkg -l | grep libffi
Which should produce an output similar to this:
ii libffi8:arm64 3.4.4-1 arm64 Foreign Function Interface library runtime
Android
- Android 8 or higher
- .apk from public.efsta.net
- Execute and install apk on the device
- Disable battery optimization on first start (even if device is always plugged in / has no battery)
- On the first start the app will ask whether to disable battery optimization. Disabling it is required to ensure the app can run in the background and will not be suspended by the OS. Please make sure to test if the app can run interruption-free on your specific device and android version.
Please make sure to keep the app's data or perform a backup/export of all data you want to keep BEFORE uninstalling. Default data deletion behavior can vary between different android device manufacturers.
Connecting the EFR see also API Profile
In order to connect the EFR with the efsta Portal (recorder: online), follow these steps:
- In the portal, navigate to “Companies” on the left side menu
- Open the properties of your company
- Locate and copy the badge number
If you are using a MultiCompany installation, the badge of an organization must be selected.
- In the EFR, go to "Profile" and paste the badge
(Optional) For MultiPOS & MultiCompany, tick the checkbox “RN/TT” at "Client Assignment" on
Please double check that the Badge is correct before saving since it cannot be changed after activation
MultiPOS is ONE installed EFR, managing multiple cash registers from the same company (usually a back-office server)
MultiCompany is ONE installed EFR, managing multiple companies, locations, and cash registers (only possible when cloud-hosting our EFR)
If you are interested in any of these two modes, please contact your partner manager for a consulting appointment!
- Save the profile, so the communication to the efsta Portal is activated.
The EFR status will change to “Online”.
Please allow communication to the efsta Portal through your firewall. If not, it will cause connection issues.
For automated / scripted deployments, EFR Profile settings can also be configured via environment variables. See: ENV-based EFR Profile Configuration (Advanced)
Step 4 - Order and configure a certificate
No information at this time.
Step 5 - efsta Implementation Checklist
Before going live, you must submit the implementation checklist for validation. To acquire access, please contact your partner manager.
Please be aware that our consulting team requires 2–4 weeks to complete the review.