E-Invoicing Poland
After the E-Invoice has been sent, it needs to be approved by KSeF (Krajowy System e-Faktur) before processing can continue. As soon as efsta receives the state of the E-Invoice, it will be updated in the Portal, followed by error handling if necessary. The EFR will however respond immediately to the register request.
ESR.DD Fields
In Poland there is no DDto field necessary, so you only have to specify DD in the transaction. Routing E-Invoices happens based on the TaxId.
The invoice status can be requested from us, allowing it to be retrieved within a few minutes.
DD="PL-TEST"- Test environment, which does not require real access credentials and should be used exclusively with anonymized test data.DD="PL-DEMO"- Pre-production (Demo) environment with realistic process flows and actual access credentials. Operates technically like the production system but has no legal effect. Only anonymized test data should be used.DD="PL"- Live environment for processing real E-Invoices. All transactions are legally binding.
Example Request
- JSON
- XML
{"Tra":
    {"ESR":
        {"D" : "2025-07-17T08:30:15", "DN" : "78312", "TL" : "001", "TT" : "1", "TN" : "1", "T" : "8.38", "Opr" : "101", "OprN" : "Mario Rossi", "OprTIN" : "xxx", "TP" : "Table 1",
        "DD" : "PL",
        "Ctm" : { "TaxId" : "PL1111111111", "Nam" : "The Sellercompany Incorporated", "Adr" : "1 Main street", "Adr2" : "Suite 123", "Zip" : "00-001", "City" : "Warszawa", "Ctry" : "PL"},
        "PosA" : [
            { "_" : "Pos", "PN" : "1", "IN" : "1001", "SKU" : "456487", "Dsc" : "Example Item", "TaxG" : "A", "Amt" : "3.98", "Qty" : "2", "QtyU" : "Pc.", "Pri" : "1.99", "Cat" : "10", "CatN" : "Example Category 10" },
            { "_" : "Pos", "PN" : "2", "IN" : "1020", "SKU" : "654854", "Dsc" : "Example Item", "TaxG" : "B", "Amt" : "1.50", "Cat" : "11", "CatN" : "Example Category 11" },
            { "_" : "Lin", "Dsc" : "Subtotal", "LAmt" : "5.48" },
            { "_" : "Pos", "PN" : "3", "IN" : "1030", "SKU" : "845868", "Dsc" : "Example Item", "TaxG" : "A", "Amt" : "2.90", "Cat" : "12", "CatN" : "Example Category 12"}
            ],
        "PayA" : [
            { "_" : "Pay", "Dsc" : "Example Payment", "PayG" : "cash", "Amt" : "10.00", "D" : "2025-07-17T08:30:15" },
            { "_" : "Pay", "Dsc" : "Example Change", "PayG" : "change", "Amt" : "-1.62", "D" : "2025-07-17T08:30:15" }
        ],
        }
    }
}
<Tra>
    <ESR D="2025-07-17T08:30:15" DN="78312" TL="001" TT="1" TN="1" T="8.38" Opr="101" OprN="Mario Rossi" OprTIN="xxx" TP="Table 1"
      DD="PL">
        <Ctm TaxId="PL1111111111" Nam="The Sellercompany Incorporated" Adr="1 Main street" Adr2="Suite 123" Zip="00-001" City="Warszawa" Ctry="PL"/>
         <PosA>
            <Pos PN="1" IN="1001" SKU="456487" Dsc="Example Item" TaxG="A" Amt="3.98" Qty="2" QtyU="Pc." Pri="1.99" Cat="10" CatN="Example Category 10" />
            <Pos PN="2" IN="1020" SKU="654854" Dsc="Example Item" TaxG="B" Amt="1.50" Cat="11" CatN="Example Category 11" />
            <Lin Dsc="Subtotal" LAmt="5.48" />
            <Pos PN="3" IN="1030" SKU="845868" Dsc="Example Item" TaxG="A" Amt="2.90" Cat="12" CatN="Example Category 12" />
        </PosA>
        <PayA>
            <Pay Dsc="Example Payment" PayG="cash" Amt="10.00" D="2025-07-17T08:30:15" />
            <Pay Dsc="Example Change" PayG="change" Amt="-1.62" D="2025-07-17T08:30:15"  />
        </PayA>
    </ESR>
</Tra>
KSeF Portal Login
Demo/Production Environment
To access the Polish National E-Invoice System (KSeF) you must authenticate using one of the following secure methods:
Option A: Qualified Electronic Seal (recommended)
A Qualified Electronic Seal is a digital certificate issued to a company. It proves that electronic documents come from your organization. It is legally valid across the EU and the recommended way for companies to log in to KSeF without using a personal PESEL number.
-
Purchasing
Choose a certified provider, such as Certum or EuroCert, to purchase the electronic seal. -
Installing the certificate
At Certum, it will be saved on a smart card inserted into a reader or in the SimplySign mobile app. You will also receive a signing application (e.g. proCertum). -
Login
To access the KSeF system, choose the appropriate environment:Once the page opens click on "Authenticate in the National System of e-Invoices". Then submit your NIP, click "Next" and choose "Qualified Certificate".
- The system will generate a login request file
- Sign the file using your provider's application with your qualified seal
- Upload the signed file to complete login
Option B: Trusted Profile
A free digital identity issued by the Polish government, only available if you have a PESEL number.
-
Register online
Go to https://pz.gov.pl/pz/register and fill in your details. -
Verify your identity
Visit a Polish embassy or consulate within 14 days of registration. You have to bring your ID (passport or national ID card) to the appointment. After confirmation, your Trusted Profile is active and valid for 3 years. -
ZAW-FA
You must submit a ZAW-FA to the tax office to associate your limited liability company to you. -
Login
To access the KSeF system, choose the appropriate environment:Once the page opens, enter your NIP, click "Next", and select "Trusted Profile" as the login method. Sign in using your Trusted Profile credentials, then click ‘Sign’ to authorize and complete the login process to the portal.
Test Environment
In the KSeF test environment, it is not necessary to use real authentication data. You can simulate the authentication process.
Test Enviornment Process
-
Access the KSeF Test Environment
- Go to the KSeF test portal
-
Login context
- Click on "Authenticate in the National System of e-Invoices"
- Enter your NIP (Tax Identification Number) & click on "Authenticate"
-
Authentication
- Select "Qualified Certificate" as the authentication method
- You’ll be asked if your certificate is a signature with a NIP or PESEL number. Select "Yes".
- Select "Stamp with NIP" as identifier type and enter the same NIP number used at the beginning
- Click "Authenticate to test application" to finish the process.
KSeF Token (deprecated)
As of EFR version 2.7.9 the prefered way of authentication in the KSeF system via the EFR happens with an Authentication Certificate.
Legacy KSeF token guide
The KSeF Token is a string of alphanumeric characters (excluding punctuation marks), assigned to the taxpayer or authorized entity and their rights.
It can be used to speed up and facilitate the process of logging into KSeF. Instead of authenticating each time, f.e with a qualified signature, you can generate a token and use that for the KSeF API authentication.
Your token authorizes efsta to issue E-Invoices on behalf of your company.
Generate Token
Once you are logged into the KSeF Portal, you will see the main dashboard.

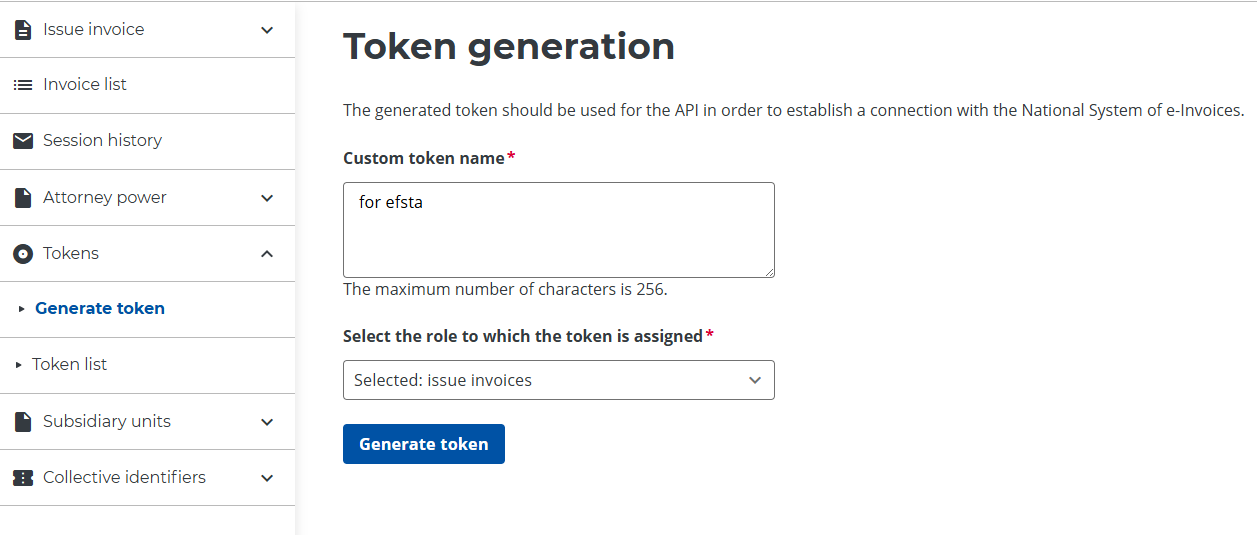
- Generate a token Go to the Tokens menu and choose to generate a new token with the role: issue invoices. Once the form has been filled in, click the "Generate Token" button.
- Copy the Token Copy the generated token and paste it into your configuration settings (see following step "Submit Token").
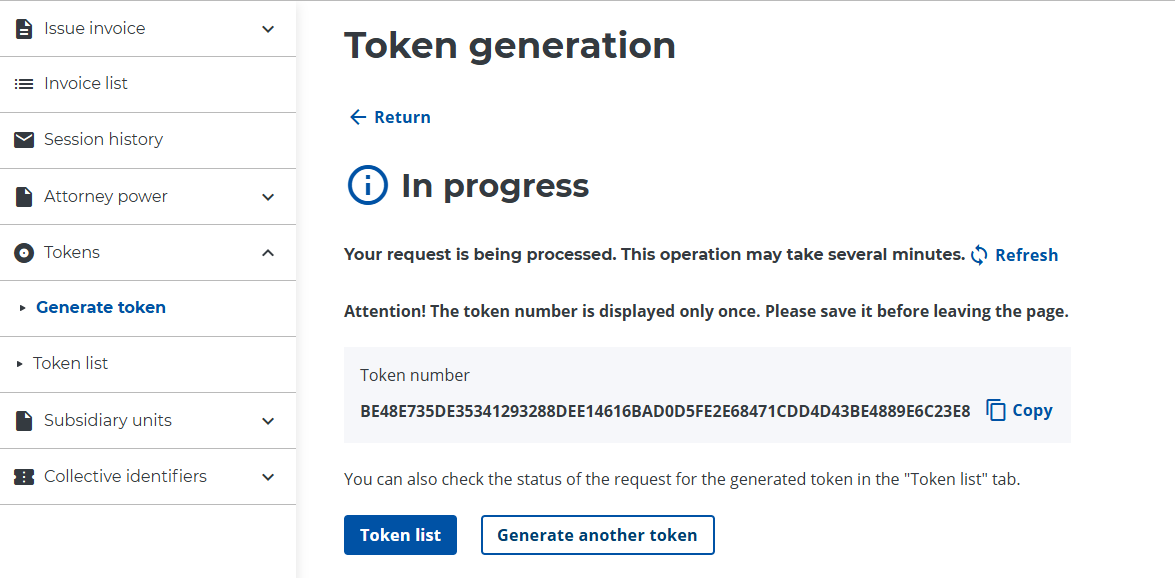
There is no expiration date for the token, so you don't need to renew it.
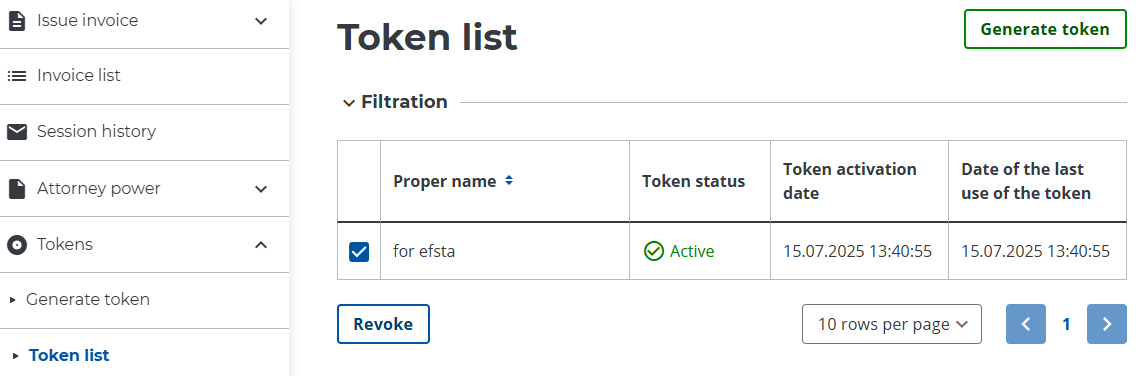
If you want to revoke the token and remove efsta’s access to issue invoices for your company, you can do so in the token list by selecting the appropriate token and clicking "Revoke":
Submit Token
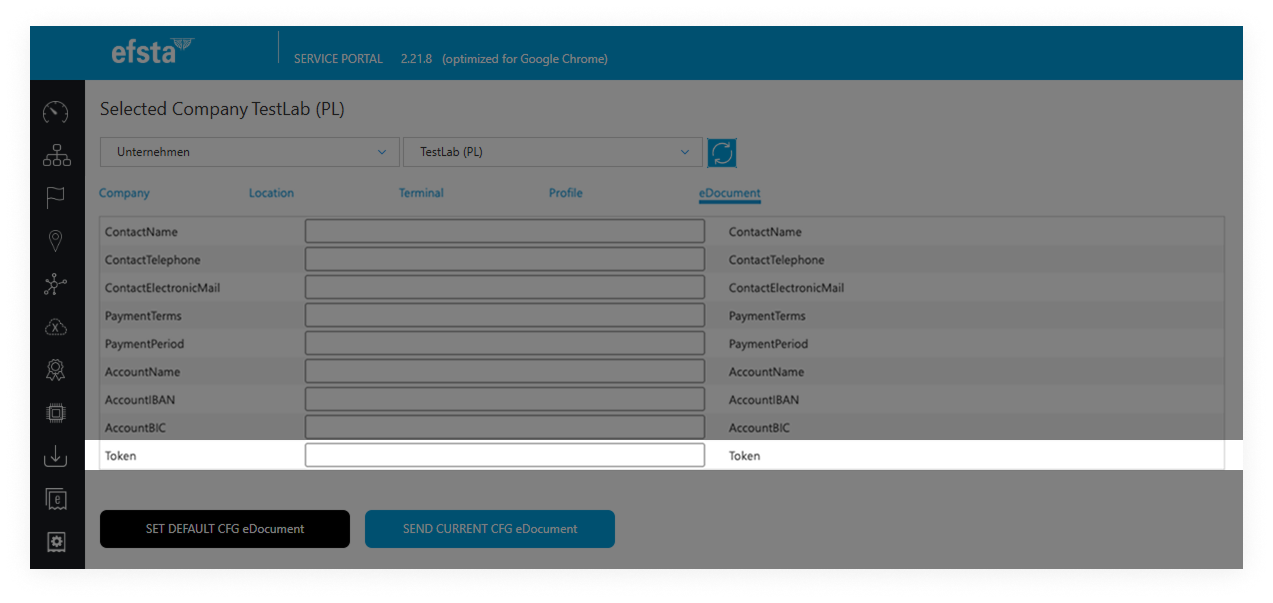
Finally, you have to paste the generated token in your configuration. You can achieve this either using the Portal or the EFR.
Portal
First, navigate to the appropriate register and click on the cloud icon to change your configuration. Then proceed to the "eDocument" tab and paste your token in the corresponding field.
EFR
Open the EFR and navigate to the KSeF tab. In the field "Token" you can paste the needed information.
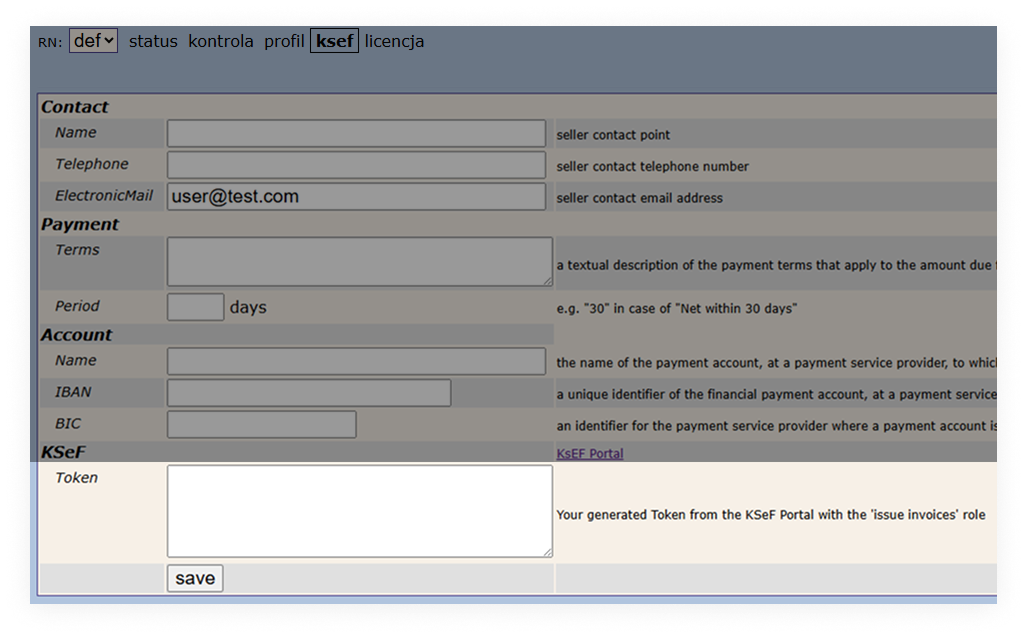
Once the token is submitted, E-Invoices are limited to that specific environment.
For example, if you generate a token from the KSeF demo portal, you can only perform DD="PL-DEMO" transactions.
KSeF Authentication Certificate
The KSeF Authentication Certificate is assigned to the taxpayer or authorized entity and their rights. Your certificate authorizes efsta to issue E-Invoices on behalf of your company.
Once a certificate is configured, E-Invoice transactions are restricted to that certificate's environment.
For example, if the certificate was issued in the KSeF Demo portal, it can only be used for DD="PL-DEMO" transactions.
Generate Certificate
Once you are logged into the KSeF Portal, you will see the main dashboard.
- Apply for the Certificate
- Once logged in to the KSeF Taxpayer Application, open the Certificates section and apply for a certificate.
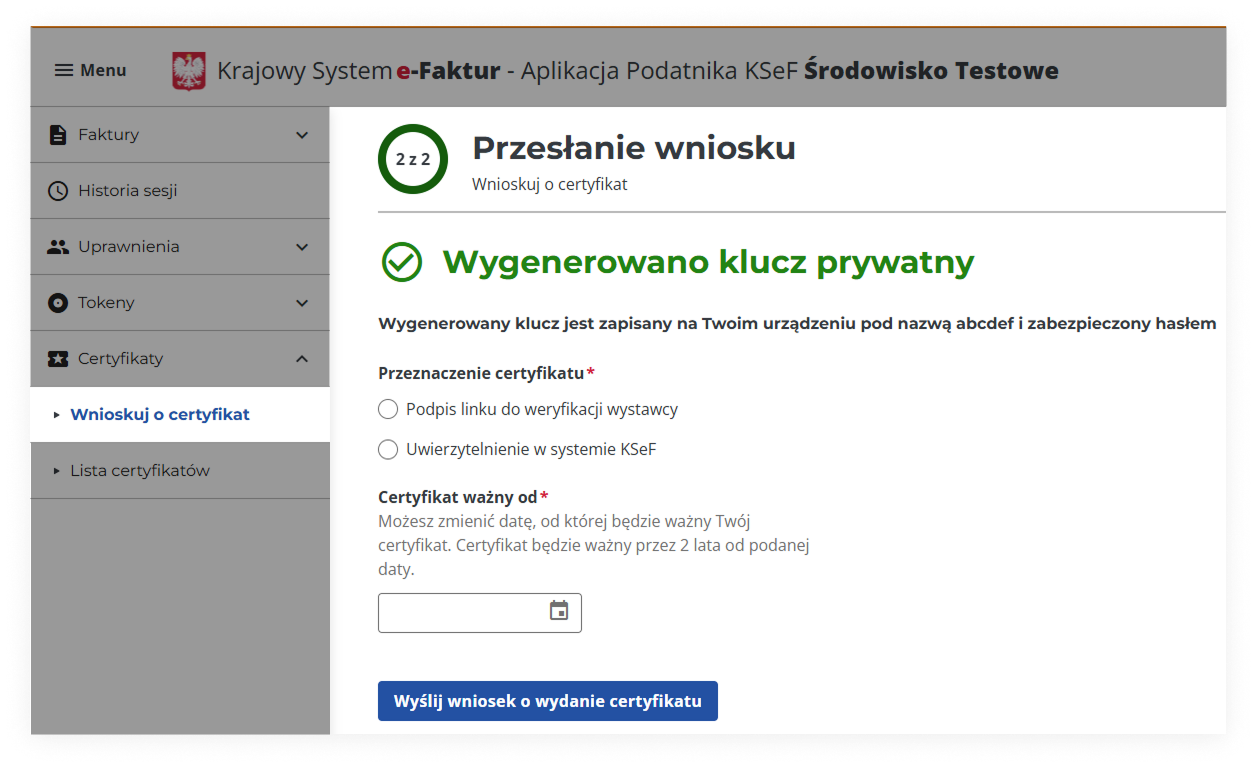
- Select the Certificate Type
- Select Authentication certificate from the available options.
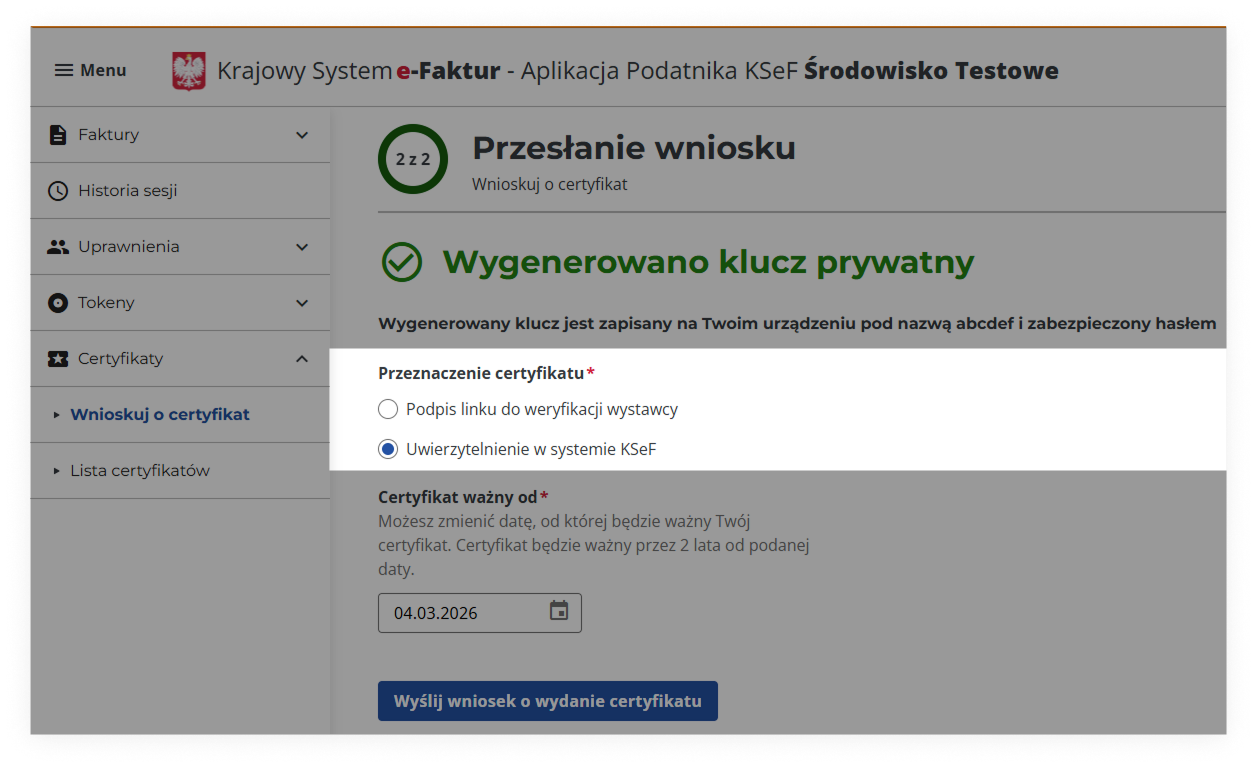
-
Download and Convert Certificate
- Download the generated
.crtand.keyfiles. Then convert them to.pfxformat for use in the efsta Portal configuration:
openssl pkcs12 -export -out auth_cert.pfx -inkey auth_cert.key -in auth_cert.crt - Download the generated
Install Certificate via efsta Portal
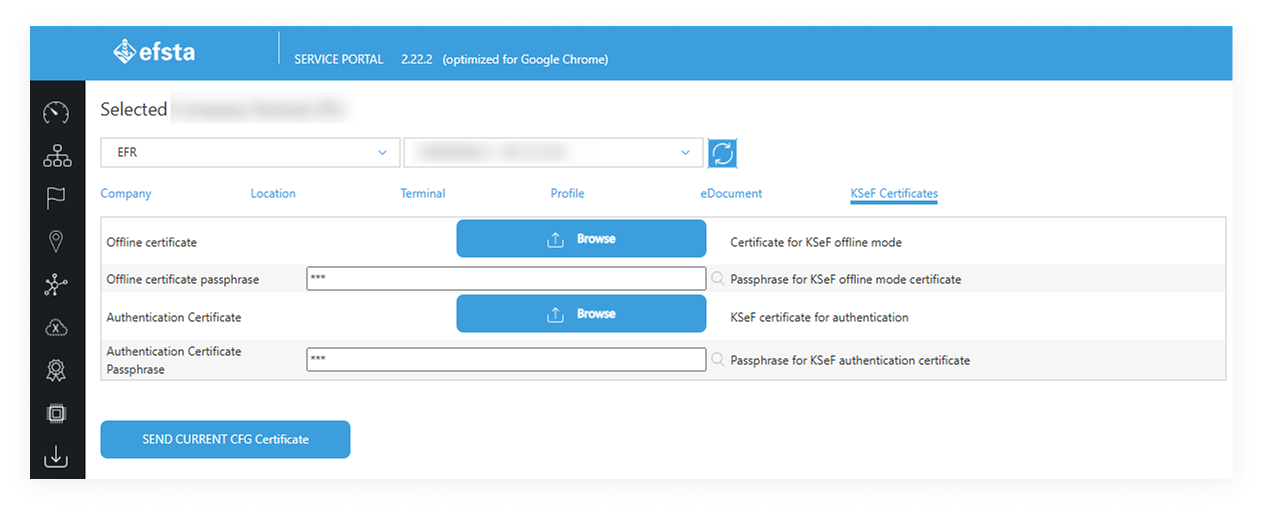
The efsta Portal only allows the simultaneous installation of both Authentication and Offline certificates, as both are needed in order for KSeF to properly function with the efsta infrastructure.
-
Find the EFR by ID in the efsta Portal
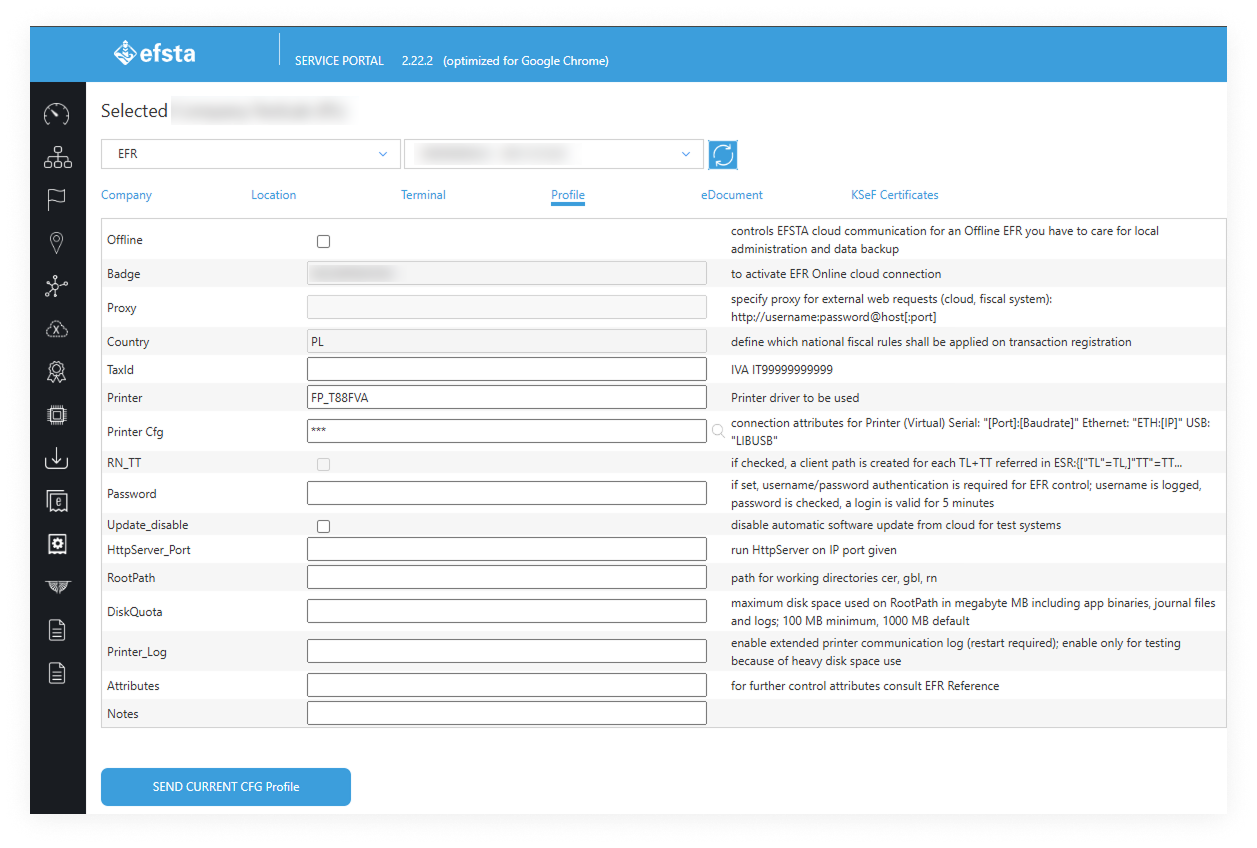
-
Open the KSeF Certificates section.
-
Upload the certificates Both Authentication certificate and Offline certificate simultaneously with the correct passwords.
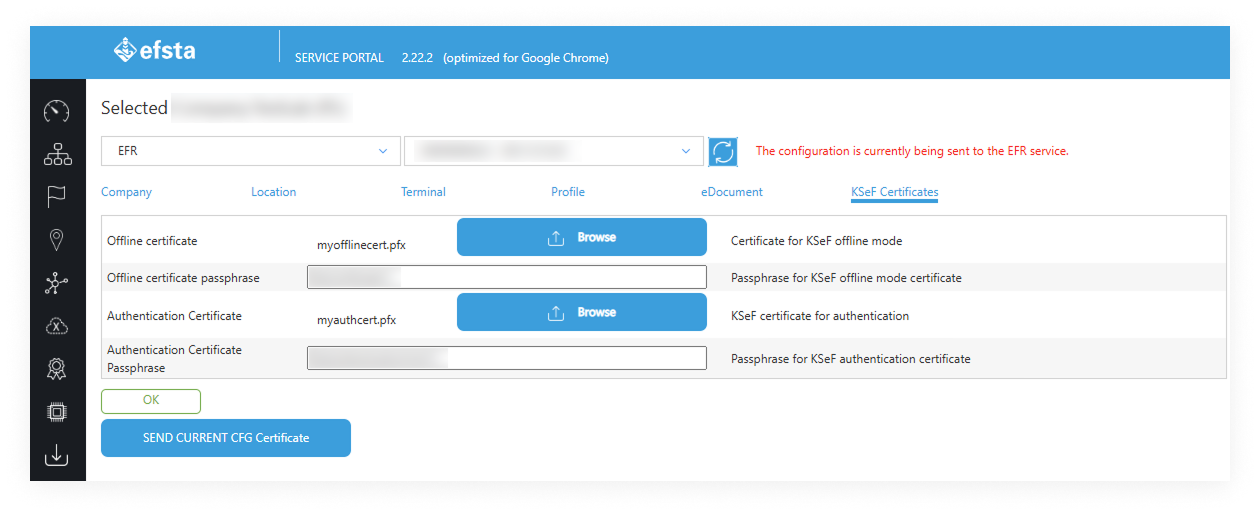
The Portal pushes the certificate to the EFR automatically via the heartbeat mechanism. Once received, the Offline certificate is installed in memory and becomes available for offline signing.
KSeF Offline Certificate
The KSeF Offline Certificate must be installed on the EFR via the efsta Portal. It is used to generate QR codes for offline printouts, for example when the POS is offline or the KSeF system is temporarily unavailable.
The certificate is bound to a specific Tax ID. It will only be applied when the company Tax ID (Profile.TaxId) matches the Tax ID stored in the certificate. If they do not match, an error is returned.
Obtain the Certificate
Once you are logged into the KSeF Portal, you will see the main dashboard.
- Apply for the Certificate
- Once logged in to the KSeF Taxpayer Application, open the Certificates section and apply for a certificate.
- Select the Certificate Type
- Select Offline certificate from the available options (name pending).

-
Download and Convert Certificate
- Download the generated
.crtand.keyfiles. Then convert them to.pfxformat for use in the efsta Portal configuration:
openssl pkcs12 -export -out offline_cert.pfx -inkey offline_cert.key -in offline_cert.crt - Download the generated
Make note of the Tax ID (NIP) associated with the certificate — this must match the Tax ID configured in the EFR profile for the certificate to be applied.
Install Certificate via efsta Portal
The efsta Portal only allows the simultaneous installation of both Authentication and Offline certificates, as both are needed in order for KSeF to properly function with the efsta infrastructure.
-
Find the EFR by ID in the efsta Portal
-
Open the KSeF Certificates section.
-
Upload the certificates Both Authentication certificate and Offline certificate simultaneously with the correct passwords.
The Portal pushes the certificate to the EFR automatically via the heartbeat mechanism. Once received, the Offline certificate is installed in memory and becomes available for offline signing.
KSeF QR Codes
KSeF requires a QR code on every fiscal document. The content of the QR code depends on whether the transaction was processed in online or offline mode.
Online Mode
In online mode, a single QR code is produced. Scanning it redirects to the KSeF application where the submitted invoice data can be viewed.
Offline Mode
In offline mode (for example when the POS is offline or the KSeF system is temporarily unavailable), two QR codes are produced:
OFFLINE: verification data for the offline transactionCERTYFIKAT: certificate and issuer-identification data
Response in DO="noprint" Mode
If no physical printer is used (DO="noprint"), the EFR returns QR code values in the TraC response.
Online Response Example
- JSON
- XML
"Fis": {
    "Tag": [
        {
            "Label": "[KSeF number]",
            "Value": "[Online QR code value]",
            "Name": "KSeF_Online_QR",
            "Type": "QR"
        }
    ]
}
<Fis>
    <Tag Label="[KSeF number]" Value="[Online QR code value]" Name="KSeF_Online_QR" Type="QR"/>
</Fis>
Offline Response Example
- JSON
- XML
"Fis": {
    "Tag": [
        {
            "Label": "OFFLINE",
            "Value": "[QR1-Value verification code]",
            "Name": "KSeF_Offline_QR1",
            "Type": "QR"
        },
        {
            "Label": "CERTYFIKAT",
            "Value": "[QR2-Value certificate]",
            "Name": "KSeF_Offline_QR2",
            "Type": "QR"
        }
    ]
}
<Fis>
    <Tag Label="OFFLINE" Value="[QR1-Value verification code]" Name="KSeF_Offline_QR1" Type="QR"/>
    <Tag Label="CERTYFIKAT" Value="[QR2-Value certificate]" Name="KSeF_Offline_QR2" Type="QR"/>
</Fis>
Printing Behavior
If a fiscal printer is configured, the EFR forwards QR code data to the printer and the QR codes are printed on the receipt. In that case, QR code values are not included in the response payload because they are already printed.
If an existing EFR installation was upgraded to version 2.7.9, delete .pug template files from rn/{rn_name}/cfg so the updated templates are applied. Alternatively, add the required KSeF QR printing code to your custom layout.
The previous QR return format is deprecated and replaced by the format shown above.
Timeout attributes
The communication between the EFR and the Cloud can be adjusted using the Fiscal_timeout attribute.
The EFR can also send a timeout value to the Cloud that controls how long the Cloud waits for the KSeF system to respond via the eDoc_Timeout attribute.
KSeF Custom Invoice Number
By default, the EFR auto-generates the KSeF invoice number (FakturaInfo/P_2) in the following format:
{type}-{efrNum}/{TL}/{TT}/{counter}
Where:
typeisIfor regular invoices andSIfor simplified invoicesefrNumis the EFR recorder number (with leading zeros stripped)TL/TTis the transaction location and terminal identifiercounterstarts at1and increments per transaction type, tracked separately per RN
To override this with a custom value, set ESR.InvoiceNumber in the transaction request. This is only applicable for invoice transactions (DT=INVOICE or NFS=INVOICE). For simplified invoices, the fiscal number is always auto-generated. When ESR.InvoiceNumber is provided, it is used directly as the KSeF invoice number.
Validation Rules
A custom InvoiceNumber must satisfy both of the following conditions:
| Rule | Constraint |
|---|---|
| Maximum length | 256 characters |
| Allowed characters | Alphanumeric (a–z, A–Z, 0–9) and /, -, _, . |
Spaces and any other special characters are not allowed. If either rule is violated, the EFR returns an error and the transaction is rejected.
Priority Logic
| Scenario | Resolved Invoice Number |
|---|---|
ESR.InvoiceNumber is provided and non-empty | Custom value (after validation) |
ESR.InvoiceNumber is absent or empty | Auto-generated {type}-{efrNum}/{TL}/{TT}/{counter} |
Example
- JSON
- XML
{
  "Tra": {
    "ESR": {
      "DD": "PL-TEST",
      "NFS": "INVOICE",
      "InvoiceNumber": "FV/2025-07-17/0042",
      "D": "2024-06-01T08:30:15",
      "TL": "001",
      "TT": "1",
      "TN": "21",
      "T": "399.00",
      "Opr": "101",
      "OprN": "Mario Rossi",
      "OprTIN": "xxx",
      "Ctm": {
        "CN": "12",
        "Nam": "Example Name",
        "Adr": "Example street 1",
        "Zip": "10115",
        "City": "Warsaw",
        "TaxId": "PL123456789"
      },
      "PosA": [
        {
          "_": "Pos",
          "PN": "1",
          "Dsc": "Example Item",
          "Amt": "399.00",
          "TaxG": "A",
          "Qty": "1",
          "QtyU": "Pc.",
          "Pri": "399.00",
          "Cat": "10",
          "CatN": "Example Category 10"
        }
      ],
      "PayA": [
        {
          "_": "Pay",
          "Dsc": "Example payment",
          "PayG": "creditcard",
          "Amt": "399.00"
        }
      ]
    }
  }
}
<Tra>
    <ESR DD="PL-TEST" NFS="INVOICE" InvoiceNumber="FV/2025-07-17/0042" D="2024-06-01T08:30:15" TL="001" TT="1" TN="21" T="399.00" Opr="101" OprN="Mario Rossi" OprTIN="12345678">
        <Ctm CN="12" Nam="Example Name" Adr="Example street 1" Zip="10115" City="Warsaw" TaxId="PL123456789" />
        <PosA>
            <Pos PN="1" Dsc="Example Item" Amt="399.00" TaxG="A" Qty="1" QtyU="Pc." Pri="399.00" Cat="10" CatN="Example Category 10" />
        </PosA>
        <PayA>
            <Pay Dsc="Example payment" PayG="creditcard" Amt="399.00" />
        </PayA>
    </ESR>
</Tra>
The InvoiceNumber value is passed directly to KSeF as FakturaInfo/P_2. The integrator is responsible for ensuring uniqueness of the value within the KSeF system for the given taxpayer.
KSeF Metadata
ESR.Metadata is an optional array that allows additional information to be attached to a KSeF transaction.
- Each entry in the array must contain
KeyandValue - The
Linefield is optional and, when provided, must be an integer
Field Reference
| Field | Description | Type | Mandatory |
|---|---|---|---|
Key | Metadata key name | String | Yes |
Value | Metadata value | String | Yes |
Line | Optional line reference | Integer | No |
Example Request
- JSON
- XML
{"Tra":
    {"ESR":
        {"D" : "2025-07-17T08:30:15", "DN" : "78312", "TL" : "001", "TT" : "1", "TN" : "1", "T" : "8.38", "Opr" : "101", "OprN" : "Mario Rossi", "OprTIN" : "xxx", "TP" : "Table 1",
        "DD" : "PL",
        "Ctm" : { "TaxId" : "PL1111111111", "Nam" : "The Sellercompany Incorporated", "Adr" : "1 Main street", "Adr2" : "Suite 123", "Zip" : "00-001", "City" : "Warszawa", "Ctry" : "PL"},
        "Metadata" : [
            { "Key" : "ProjectCode", "Value" : "PRJ-001", "Line" : 1 },
            { "Key" : "ExampleKey", "Value" : "Example Value" }
        ],
        "PosA" : [
            { "_" : "Pos", "PN" : "1", "IN" : "1001", "SKU" : "456487", "Dsc" : "Example Item", "TaxG" : "A", "Amt" : "3.98", "Qty" : "2", "QtyU" : "Pc.", "Pri" : "1.99", "Cat" : "10", "CatN" : "Example Category 10" },
            { "_" : "Pos", "PN" : "2", "IN" : "1020", "SKU" : "654854", "Dsc" : "Example Item", "TaxG" : "B", "Amt" : "1.50", "Cat" : "11", "CatN" : "Example Category 11" },
            { "_" : "Lin", "Dsc" : "Subtotal", "LAmt" : "5.48" },
            { "_" : "Pos", "PN" : "3", "IN" : "1030", "SKU" : "845868", "Dsc" : "Example Item", "TaxG" : "A", "Amt" : "2.90", "Cat" : "12", "CatN" : "Example Category 12"}
            ],
        "PayA" : [
            { "_" : "Pay", "Dsc" : "Example Payment", "PayG" : "cash", "Amt" : "10.00", "D" : "2025-07-17T08:30:15" },
            { "_" : "Pay", "Dsc" : "Example Change", "PayG" : "change", "Amt" : "-1.62", "D" : "2025-07-17T08:30:15" }
        ],
        }
    }
}
<Tra>
    <ESR D="2025-07-17T08:30:15" DN="78312" TL="001" TT="1" TN="1" T="8.38" Opr="101" OprN="Mario Rossi" OprTIN="xxx" TP="Table 1"
      DD="PL">
        <Ctm TaxId="PL1111111111" Nam="The Sellercompany Incorporated" Adr="1 Main street" Adr2="Suite 123" Zip="00-001" City="Warszawa" Ctry="PL"/>
        <Metadata>
            <Meta Key="ProjectCode" Value="PRJ-001" Line="1" />
            <Meta Key="ExampleKey" Value="Example Value" />
        </Metadata>
         <PosA>
            <Pos PN="1" IN="1001" SKU="456487" Dsc="Example Item" TaxG="A" Amt="3.98" Qty="2" QtyU="Pc." Pri="1.99" Cat="10" CatN="Example Category 10" />
            <Pos PN="2" IN="1020" SKU="654854" Dsc="Example Item" TaxG="B" Amt="1.50" Cat="11" CatN="Example Category 11" />
            <Lin Dsc="Subtotal" LAmt="5.48" />
            <Pos PN="3" IN="1030" SKU="845868" Dsc="Example Item" TaxG="A" Amt="2.90" Cat="12" CatN="Example Category 12" />
        </PosA>
        <PayA>
            <Pay Dsc="Example Payment" PayG="cash" Amt="10.00" D="2025-07-17T08:30:15" />
            <Pay Dsc="Example Change" PayG="change" Amt="-1.62" D="2025-07-17T08:30:15"  />
        </PayA>
    </ESR>
</Tra>
Simplified Invoices
Classification Logic
The EFR classifies every KSeF transaction as either a regular invoice or a simplified invoice, based solely on the value of the DT and NFS fields. The transaction total (ESR.T) does not affect this classification.
| ESR Fields | Invoice Type | KSeF RodzajFaktury |
|---|---|---|
DT=INVOICE or NFS=INVOICE | Regular | VAT |
Neither set to INVOICE (including absent, empty, or any other value) | Simplified | UPR |
A standard POS receipt sent with DD="PL" (or PL-DEMO/PL-TEST) and without DT=INVOICE or NFS=INVOICE will automatically be processed as a simplified invoice. No additional flags or configuration are needed.
Buyer Data Requirements
| Field | Regular Invoice | Simplified Invoice |
|---|---|---|
Ctm.TaxId | Required | Optional — if omitted, KSeF receives BrakID=1 (no buyer identification) |
Ctm.Nam | Required | Optional — included when provided |
Ctm.Adr | Required | Optional — included when provided |
If Ctm.TaxId is provided, it must follow the standard format (e.g. PL1234567890). If the country prefix is omitted, the EFR prepends PL (or Ctm.Ctry if set).
450 PLN Limit
If the total (ESR.T) exceeds 450 PLN on a simplified invoice, the EFR returns a non-blocking warning:
#SIMPLIFIED_INVOICE_LIMIT — Transaction is a simplified invoice although the amount exceeds 450 PLN
This is a warning only — the transaction is still processed and submitted to KSeF. The POS can decide how to handle this (e.g. inform the operator, switch to a regular invoice by adding NFS=INVOICE to the request).
Example: Simplified Invoice Request (Sale)
The absence of DT and NFS triggers simplified invoice processing. Only DD is required — Ctm.TaxId is optional.
- XML
- JSON
<Tra>
    <ESR D="2025-07-17T08:30:15" DN="78312" TL="001" TT="1" TN="1" T="3.98" Opr="101" OprN="Mario Rossi" DD="PL">
        <Ctm TaxId="PL1111111111"/>
        <PosA>
            <Pos PN="1" Dsc="Example Item" TaxG="A" Amt="3.98" Qty="2" QtyU="Pc." Pri="1.99" />
        </PosA>
        <PayA>
            <Pay Dsc="Cash" PayG="cash" Amt="5.00" D="2025-07-17T08:30:15" />
            <Pay Dsc="Change" PayG="change" Amt="-1.02" D="2025-07-17T08:30:15" />
        </PayA>
    </ESR>
</Tra>
{
  "Tra": {
    "ESR": {
      "D": "2025-07-17T08:30:15",
      "DN": "78312",
      "TL": "001",
      "TT": "1",
      "TN": "1",
      "T": "3.98",
      "Opr": "101",
      "OprN": "Mario Rossi",
      "DD": "PL",
      "Ctm": {
        "TaxId": "PL1111111111"
      },
      "PosA": [
        {
          "_": "Pos",
          "PN": "1",
          "Dsc": "Example Item",
          "TaxG": "A",
          "Amt": "3.98",
          "Qty": "2",
          "QtyU": "Pc.",
          "Pri": "1.99"
        }
      ],
      "PayA": [
        {
          "_": "Pay",
          "Dsc": "Cash",
          "PayG": "cash",
          "Amt": "5.00",
          "D": "2025-07-17T08:30:15"
        },
        {
          "_": "Pay",
          "Dsc": "Change",
          "PayG": "change",
          "Amt": "-1.02",
          "D": "2025-07-17T08:30:15"
        }
      ]
    }
  }
}